Integral heated rear window/radio aerial amplifier - removal and refitting
1 Disconnect the battery negative lead.
Saloon models
2 Remove both rear seat side cushions.
3 Remove the securing screws and withdraw the rear parcel shelf.
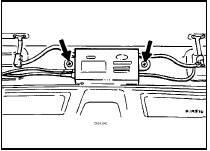
4 Make a note of the wiring connections for use when refitting, then disconnect the wiring, remove the two securing screws, and withdraw the amplifier unit (see illustration).

54.4 Integral heated rear window/radio aerial amplifier securing screws
(arrowed) - Saloon models
5 Refitting is a reversal of removal.
Hatchback models
6 Unclip the tailgate trim panel.
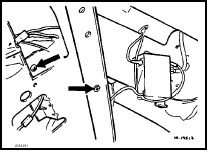
7 Remove the amplifier bracket securing screws, and withdraw the amplifier through the tailgate panel aperture (see illustration).

54.7 Integral heated rear window/radio aerial amplifier bracket securing
screws (arrowed) - Hatchback models
8 Make a note of the wiring connections for use when refitting, then disconnect the wiring and remove the amplifier unit.
9 Refitting is a reversal of removal.
Estate models
10 Unclip the tailgate trim panel.
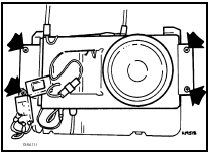
11 Make a note of the wiring connections for use when refitting, then disconnect the wiring, remove the four securing screws, and detach the loudspeaker/amplifier bracket assembly from the tailgate (see illustration).

54.11 Loudspeaker/integral heated rear window/radio aerial amplifier bracket
securing screws (arrowed) - Estate models
12 Refitting is a reversal of removal.
See also:
Engine oil
Checking the engine oil
Refer to the scheduled maintenance guide for the appropriate intervals
for checking the engine oil.
1. Make sure the vehicle is on level ground.
2. Turn the engine off an ...
Ford Escort maintenance schedule
The maintenance intervals in this manual are provided with the
assumption that you, not the dealer, will be carrying out the work. These
are the minimum maintenance intervals recommended by the
man ...
Carburettors (all types) - dismantling and reassembly
1 A complete strip-down of a carburettor is
unlikely to cure a fault which is not
immediately obvious without introducing new
problems. If persistent carburation problems
are encountered, it is re ...
