AM/FM radio with compact disc player
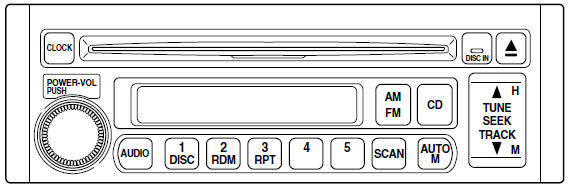
Volume/power control
Ensure that the ignition switch is in the ACC or ON position.
Press the control to turn the audio system on. Turn the control to raise or lower the volume.
Press the control again to turn the
audio system off. 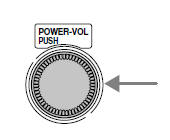
NOTE: To prevent the battery from being discharged, do not leave the audio system on for a long period when the engine is not running.
AM/FM select
The AM/FM control works in radio
mode. 
AM/FM select in radio mode
This control allows you to select AM or FM frequency bands. Press the control to toggle between AM, FM1 or FM2 memory preset stations. The selected mode will be indicated in the display. If FM stereo is enabled, ST will be illuminated in the display.
NOTE: If the FM broadcast signal becomes weak, reception automatically changes from STEREO to MONO for reduced noise, and the ST indicator will go out.
Tune adjust
The tune control works in radio mode.
Tune adjust in radio mode
- Press
 to move up the
frequency band in individual increments.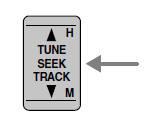
- Press
 to move down the
frequency band in individual increments.
Seek function
The seek function control works in radio mode.
Seek function in radio mode
Press and momentarily hold the
SEEK control. A beep will sound
indicating you have entered seek
mode. 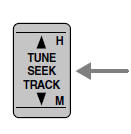
- Press
 to find the next
listenable station up the frequency band. - Press
 to find the next
listenable station down the frequency band.
NOTE: If you continue to press and hold the control, the frequency will continue changing without stopping. Release the control after the beep sounds.
Tracking feature
The tracking feature works in CD mode.
Tracking feature in CD mode
- Press
 to advance to the
next selection. Press and hold the control to fast forward through the current selection.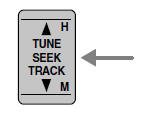
- Press
 to reverse to the
previous selection. Press and hold the control to rewind through the current selection.
Scan function
The scan function works in radio
mode. 
Scan function in radio mode
Press the SCAN control to hear a sampling of strong stations on the frequency band. Each station will play for approximately 5 seconds.
Press the SCAN control again to remain on a station and disable this mode.
CD select
- To begin CD play (if CD is
loaded), press the CD control, or
- Insert the compact disc, label side up into the CD slot (if no CD is loaded). The auto loading mechanism will pull in the CD. There will be a short lapse before play begins.
- The first track of the disc will begin playing. The DISC IN control will illuminate.
- The track number will appear in the display.
To disable CD mode, press the power/volume control.
Treble adjust
The treble adjust control allows you
to increase or decrease the audio
system's treble output. 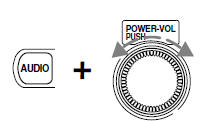
Press the AUDIO control until TREB is illuminated in the display.
Turn the volume control to adjust to the desired level of treble.
NOTE: The volume can be adjusted without pressing the AUDIO function control.
Bass adjust
The bass adjust control allows you
to increase or decrease the audio
system's bass output. 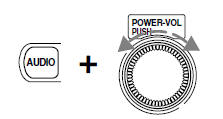
Press the AUDIO control until BASS is illuminated in the display.
Turn the volume control to adjust to the desired level of bass.
Speaker fade adjust
Speaker sound can be adjusted
between the front and rear
speakers. 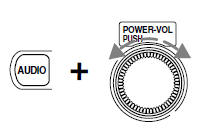
Press the AUDIO control until FADE is illuminated in the display.
Turn the volume control to adjust the speaker output.
Speaker balance adjust
Speaker sound distribution can be
adjusted between the right and left
speakers. 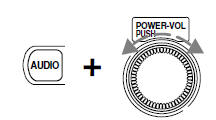
Press the AUDIO control until BAL is illuminated in the display.
Turn the volume control to adjust the speakers.
NOTE: Approximately 5 seconds after selecting any AUDIO mode (treble, bass, fade, balance or volume), the system will automatically default to the volume function. To reset these modes, press and momentarily hold the AUDIO control. The unit will beep and CL will appear in the display.
Radio station memory preset
The radio is equipped with five station memory preset controls. These controls can be used to select up to five preset AM stations and ten FM stations (five in FM1 and five in FM2).
Setting memory preset stations
1. Select the frequency band with the AM/FM control.
2. Select the desired station.
3. Press and momentarily hold the desired preset control until a beep is heard.
The preset control number will illuminate in the display. This indicates the station is held in memory on the control you selected. Repeat this procedure to store other stations in memory.
Auto memory tuning
Auto memory tuning allows you to set strong radio stations without losing your original manually set preset stations. This is especially useful when you are in an area where the local stations are not known.
Starting auto memory tuning
1. Select a frequency using the AM/FM control.
2. Press and momentarily hold the
AUTO M (auto memory) control. 
3. The audio system will select the five strongest stations on the frequency band. When the stations are filled, the station stored in memory preset control 1 will start playing.
Press the AUTO M control to recall stations in the auto memory. One station will be selected each time you press the AUTO M control and the auto memory number will be displayed.
NOTE: If the power supply is interrupted (the fuse blows or the battery is disconnected), the preset channels will be canceled.
Random play
The random play feature works in
CD mode and plays the selections
on the current CD in random order . 
Random play in CD mode
Press the RDM control during play. RDM will illuminate in the display.
The next selection will be randomly selected.
To disengage random play , press the RDM control again.
Repeat play
The repeat play feature works in CD
mode and repeats the current CD
selection. 
Repeat play in CD mode
Press the RPT control during play. RPT will illuminate in the display.
The current selection will be repeated.
To disengage repeat play, press the RPT control again.
Eject function
Press the control to stop and eject a
CD. 
Setting the clock
- Ensure that the ignition is in the
ACC or ON position.
- Press and momentarily hold the CLOCK control until a beep is heard. The current time will flash in the display.
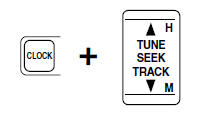
- Press the
 to increase the
hours.- Press the
 to increase the
minutes.- Press the CLOCK control again when the desired time is set to activate the clock.
NOTE: If the power supply to the unit is interrupted (if the fuse blows or the vehicle's battery is disconnected), the clock will need to be reset.
NOTE: If the time is not adjusted while the clock's current time is
flashing (if neither  or
or
 is pressed), and the CLOCK control
is
pressed a second time, the minutes will be set to 00. If the current time
setting is within the first half of the hour (01-29), the hour setting will
automatically reverse one hour. For example, if the original setting is
3:24, the time will change to 3:00. If the clock's current time setting is
within the latter part of the hour (from30 to 59 minutes), the hour
setting will automatically advance one hour. For example, if the original
setting is 3:45, the time will change to 4:00.
Changing the display mode
Press the CLOCK control to
alternate the display between time
and audio. 
NOTE: If audio operation is selected while the time mode is on, the selected audio mode will be displayed for 10 seconds, then the display will revert to the time mode.
RADIO FREQUENCIES
AM and FM frequencies are established by the Federal Communications Commission (FCC) and the Canadian Radio and Telecommunications Commission (CRTC). Those frequencies are:
AM - 530, 540-1700, 1710 kHz FM- 87.7, 87.9-107.7, 107.9 MHz
RADIO RECEPTION FACTORS
There are three factors that can effect radio reception:
- Distance/strength: The further you travel from an FM station, the weaker the signal and the weaker the reception.
- Terrain: Hills, mountains, tall buildings, power lines, electric fences, traffic lights and thunderstorms can interfere with your reception.
- Station overload: When you pass a broadcast tower, a stronger signal may overtake a weaker one and play while the weak station frequency is displayed.
CASSETTE/PLAYER CARE
Do:
- Use only cassettes that are 90 minutes long or less.
- Tighten very loose tapes by inserting a finger or pencil into the hole and turning the hub.
- Remove loose labels before inserting tapes.
- Allow tapes which have been subjected to extreme heat, humidity or cold to reach a moderate temperature before playing.
- Clean the cassette player head with a cassette cleaning cartridge after 10-12 hours of play to maintain good sound/operation.
Don't:
- Expose tapes to direct sunlight, extreme humidity, heat or cold.
- Leave tapes in the cassette player for a long time when not being played.
CD/CD PLAYER CARE
Do:
- Handle discs by their edges only. Never touch the playing surface.
- Inspect discs before playing. Clean only with an approved CD cleaner and wipe from the center out.
Don't:
- Expose discs to direct sunlight or heat sources for extended periods of time.
- Insert more than one disc into each slot of the CD changer magazine.
- Clean using a circular motion.
CD units are designed to play commercially pressed 12 cm (4.75 in) audio compact discs only. Due to technical incompatibility, certain recordable and re-recordable compact discs may not function correctly when used in Ford CD players. Irregular shaped CDs, CDs with a scratch protection film attached, and CDs with homemade paper (adhesive) labels should not be inserted into the CD player. The label may peel and cause the CD to become jammed. It is recommended that homemade CDs be identified with permanent felt tip marker rather than adhesive labels. Ball point pens may damage CDs. Please contact your dealer for further information.
AUDIO SYSTEM WARRANTY AND SERVICE
Refer to the Warranty Guide for audio system warranty information. If service is necessary, see your dealer or qualified technician.
See also:
Throttle valve control motor (1.6 and 1.8 litre (R6A type) CVH) - removal
and refitting
1.6 litre
1 Disconnect the battery negative lead.
2 Remove the air cleaner.
3 Disconnect the wiring connectors from the
throttle valve control motor, and the throttle
position sensor, pulling on ...
Specifications
General
System type . . . . . . . . . . . . . . . . . . . . . . . . . . . . . . . . . .
. . . . . . . . . . . . Single-point electronic fuel injection
Application . . . . . . . . . . . . . . . . . ...
Headlamp wiper motor - removal and refitting
Note: On vehicles fitted with foglamps, the
headlamp unit must be removed when the righthand
headlamp wiper motor is to be removed.
Removal
1 Disconnect the battery negative lead.
2 Disconnect th ...
