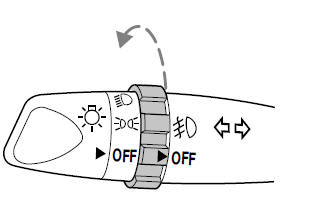
Headlamp control
 Turns the lamps off.
 Turns on the parking
lamps, instrument panel lamps,
license plate lamps and tail lamps.
 Turns the headlamps on.
Foglamp control (if equipped) 
Rotate forward to activate.
High beams 
Push the lever toward the instrument panel to activate. Pull the lever towards you to deactivate.

Flash to pass
Pull toward you slightly to activate and release to deactivate.
PANEL DIMMER CONTROL 
Use to adjust the brightness of the instrument panel during headlamp and parklamp operation.
- Rotate up to brighten.
- Rotate down to dim.
The dome lamp will not illuminate if the control switch is in the OFF position.
AIMING THE HEADLAMPS
Your vehicle is equipped with a Vehicle Headlamp Aim Device (VHAD) on each headlamp. Each headlamp may be properly aimed in the vertical (up/down) and the horizontal (left/right) directions using your VHAD system. The headlamps on your vehicle are properly aimed at the assembly plant.
A bubble (vertical indicator) that is not centered between the two red lines does not necessarily indicate out-of-aim headlamps. If your vehicle is not positioned on a level surface, the slope will be included in the vertical indication. Therefore, vertical and horizontal headlamp adjustment should be performed only when the beam direction appears to be incorrect.
You will need one 4 mm wrench or socket to make the adjustments.
If the vehicle has been in an accident, the vehicle's front structure should be properly aligned before aiming the headlamps.
Horizontal aim adjustment
1. Park the vehicle on a level surface.
2. With the hood open, locate the
horizontal indicator and the
adjusting screw. They are located
below the viewing window at the
rear of the headlamp assembly. 
3. The "L" and "R" under the viewing window on the top of the headlamp refer to the directional change (left or right) of the horizontal aim.
4. Use a 4 mm wrench or socket to turn the horizontal adjusting screw until the forward edge of the knurled portion of the screw is aligned with the "0" reference mark (as shown) on the plastic slider when viewed directly from above.
Vertical aim adjustment
1. Park the vehicle on a level surface.
2. With the hood open, locate the bubble level and the vertical adjustment screw. The adjustment screw is located on the outboard side of the headlamp below the headlamp upper attachment.

3. The "UP" and "DN" on the bubble indicate the directional change (up or down) of the vertical aim.
4. Use a 4 mm wrench or socket to turn the vertical adjusting screw clockwise or counterclockwise until the bubble is centered between the lines.
Repeat the above process to the other headlamp, if necessary.
TURN SIGNAL CONTROL 
- Push down to activate the left turn signal.
- Push up to activate the right turn signal.
INTERIOR LAMPS
Dome lamp and map lamps (if equipped)
The dome lamp is located overhead between the driver and passenger seats.
The dome lamp will stay on if the control is moved to the ON position.
When the control is moved to the DOOR position, the lamp will only come on if a door is opened. If the control is moved to the OFF position, the lamp will not come on at all.
The map lamps and controls are located on the dome lamp. Press the controls on either side of each map lamp to activate the lamps.

Map lamps (if equipped)
The map lamps and controls are located on the dome lamp. Press the controls on either side of the dome lamp to activate the map lamps.
If equipped with a moon roof, the map lamps are located on the moon roof control panel. Press the control next to the map lamp to illuminate the lamp.
See also:
Engine dismantling, examination, renovation and reassembly - general
information
Dismantling
1 It is best to mount the engine on a
dismantling stand but if this is not available,
stand the engine on a strong bench at a
comfortable working height. Failing this, it will
have to ...
Alternator - removal and refitting
Note: Refer to the precautions at the end of
Section 1 before proceeding.
Removal
1 The operations are similar for all makes of
alternator.
2 Disconnect the battery negative terminal,
then disco ...
Rear disc caliper - removal, overhaul and refitting
Note: Complete dismantling of the rear caliper
should not be attempted unless Ford spring
compressor (tool No 12-007) is available, or
unless the problems likely to arise in the
absence of the too ...
