Weber 2V carburettor automatic choke unit - adjustment
XR3 models 1 Remove the air cleaner as described in Section 2.
2 Disconnect the electrical lead to the automatic choke.
3 Unscrew and remove the three screws which hold the automatic choke housing cover in position (see illustration). Withdraw the cover and bi-metal coil, followed by the internal heat shield.
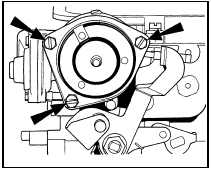
14.3 Weber 2V carburettor automatic choke housing cover screw locations - XR3
models
4 The choke plate vacuum pull-down should now be adjusted. To do this, fit a rubber band to the choke plate lever, open the throttle to allow the choke plates to close and then secure the band to keep the plates closed (see illustration).
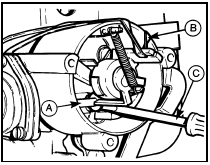
14.4 Weber 2V carburettor vacuum pulldown check - XR3 models
A Diaphragm connecting push-rod B Rubber band holding choke plates closed C Screwdriver
5 Using a screwdriver, push the diaphragm open to its stop and measure the clearance between the lower edge of the primary choke plate and the air horn using a twist drill or other gauge rod. Where the clearance is outside that specified, remove the plug from the diaphragm housing and turn the screw, now exposed, in or out as necessary (see illustration).
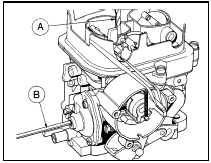
14.5 Weber 2V carburettor vacuum pulldown adjustment - XR3 models
A Twist drill
B Adjusting the pull-down setting
6 Refit the plug and remove the rubber band.
7 The choke phasing must now be checked and adjusted. Hold the throttle partially open and set the fast idle cam so that the fast idle screw is located on the centre step of the cam. Release the throttle so that the cam is held in this position (see illustration).
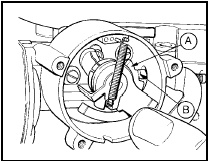
14.7 Weber 2V carburettor choke phasing check - XR3 models
A Fast idle cam
B Fast idle adjustment screw positioned on
centre step of cam
8 Push the choke plates downward until the step on the cam jams against the fast idle screw. Now measure the clearance between the lower edge of the primary choke plate and the air horn using a twist drill or gauge rod of suitable diameter.
9 Where necessary, bend the tag to adjust the clearance (see illustration).
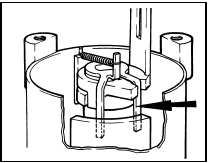
14.9 Weber 2V carburettor choke phasing adjustment - XR3 models
Bend tag (arrowed) to achieve specified clearance
10 Refit the heat shield, making sure that the locating peg is correctly engaged in the notch in the housing (see illustration).
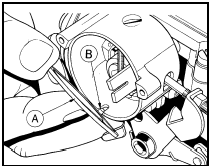
14.10 Weber 2V carburettor heat shield reassembly - XR3 models
A Heat shield
B Locating peg engaged with housing notch
11 Offer up the cover and engage the bimetal coil with the slot in the choke lever which projects through the cut-out in the heat shield.
12 Screw in the retaining screws finger tight and then rotate the cover to set the cover mark opposite the centre index line (see illustration).
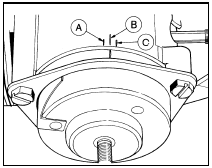
14.12 Weber 2V carburettor choke housing alignment marks - XR3 models
A Rich position
B Index mark
C Weak position
13 Reconnect the lead to the choke.
14 Refit the air cleaner.
1.6 litre models - 1986 onwards 15 Remove the air cleaner (Section 2).
16 Release any pressure in the cooling system by loosening the pressure cap (see Chapter 1), then detach the water inlet and outlet hoses at the automatic choke unit. Clamp the hoses or position them with their ends facing upwards to minimise coolant leakage.
17 Undo the three screws and detach the choke bi-metal coil housing followed by the internal heat shield.
18 Fit a rubber band to the choke plate lever, open the throttle to allow the choke plate to close, and then secure the band to keep the plate closed (see illustration).
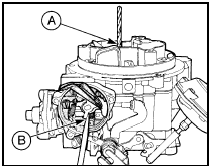
14.18 Weber 2V carburettor vacuum pulldown adjustment - 1.6 litre models
A Twist drill
B Diaphragm pushed fully open with rubber
band holding choke plate closed
19 Using a screwdriver, push the diaphragm open to its stop and measure the clearance between the lower edge of the choke plate and the air horn using a twist drill or other gauge rod. Where the clearance is outside that specified, remove the plug from the diaphragm housing and turn the screw, now exposed, in or out as necessary.
20 Fit a new diaphragm housing plug and remove the rubber band.
21 Refit the heat shield, making sure that the locating peg is correctly engaged in the notch in the housing.
22 Place the bi-metal coil housing in position with the coil engaged with the slot in the choke lever which projects through the cutout in the heat shield.
23 Screw in the retaining screws finger tight and then rotate the housing to set the mark opposite the dot punch mark on the choke body. Secure the housing.
24 Reconnect the hoses and refit the air cleaner.
25 Check and if necessary top-up the cooling system as described in Chapter 1.
See also:
Handbrake lever - removal and refitting
Removal
1 Chock the rear wheels, jack up the front of
the vehicle and support on axle stands.
Release the handbrake. Disconnect the
battery negative lead.
2 Slacken the handbrake cable adjuster.
...
Cylinder head - inspection and renovation
Note: On engines fitted with hardened valve
seats for use with unleaded petrol, valve and
valve seat grinding and recutting cannot be
carried out without the use of specialist
equipment. Consult a ...
Thermo-time switch - removal and refitting
Removal
1 Disconnect the battery negative lead.
2 Drain the cooling system as described in
Chapter 1.
3 Raise the front of the car and support it on
axle stands (see “Jacking and Vehicle
Support ...
