Idle Speed Control Valve (ISCV) - removal, cleaning and refitting
Removal
1 Disconnect the battery negative lead.
2 Disconnect the valve wiring plug (see illustration).
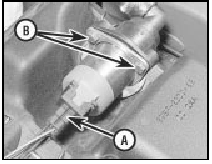
12.2 Idle speed control valve - 1.6 EFI engine
A Wiring plug B Securing bolts
3 Unscrew the two securing bolts, and withdraw the valve from the air cleaner housing.
Cleaning
4 Remove the valve as described earlier in
this Section.
5 Immerse the valve in a container of clean petrol and allow it to soak for approximately three minutes.
6 Use a clean paint brush to clean the bore, slots and piston of the valve.
7 Using a small screwdriver, carefully move the piston up and down in the bore (do not use the slots to do this), then rinse the valve with petrol and dry it, preferably using compressed air (see illustration).
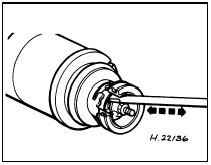
12.7 Using a screwdriver to move the idle speed control valve piston - 1.6
EFI engine
8 Refit the valve as described in the following paragraphs.
Refitting
9 Refitting is a reversal of removal, ensuring
that the mating faces of the valve and air
cleaner are clean.
10 On completion, start the engine and check that the idle speed is stable, and that there are no air leaks. Warm the engine up to normal operating temperature, then switch on all available electrical loads and check that the idle speed is maintained.
See also:
Steering column - removal, overhaul and refitting
Removal
1 Disconnect the battery negative terminal.
2 Turn the ignition key and rotate the steering
wheel to bring the front roadwheels to the
straight-ahead position.
3 Working within the engine ...
General information and precautions
General information
From the 1990 model year, an Electronic
Fuel Injection (EFI) system controlled by the
Electronic Engine Control IV (EEC IV) system,
and incorporating an Electronic
Distributor ...
Fuel accumulator - removal and refitting
Note: Refer to the precautions at the end of
Section 1 before proceeding.
Pre-1986 models
Removal
1 The fuel accumulator is mounted adjacent
to the fuel pump, above the rear left-hand
suspension ...
