Fuel pressure regulator - removal and refitting
Removal
1 Remove the CFI unit as described in Section 8.
2 Remove the four screws securing the regulator housing to the CFI unit, then carefully lift off the housing and recover the ball, cup, large spring, diaphragm, valve, and small spring, noting the position and orientation of all components (see illustration).
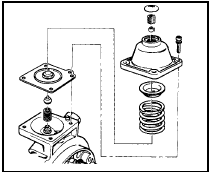
9.2 Exploded view of fuel pressure regulator - 1.4 CFI engine
Do not attempt to prise the plug from the regulator housing, or adjust the Allen screw (if no plug is fitted); this will alter the fuel system pressure.
3 Examine all components and renew any
defective items as necessary
Refitting
4 Commence reassembly by supporting the
CFI unit on its side so that the regulator
components can be fitted from above.
5 Fit the small spring, valve, diaphragm (ensuring that it locates correctly), large spring, and the spring cup.
6 Carefully place the ball into position on the spring cup, and ensure that it locates correctly.
7 Refit the regulator housing, taking great care to avoid disturbing the ball, and once correctly in position, tighten the screws evenly to avoid distorting the diaphragm.
8 Refit the CFI unit as described in Section 8.
9 On completion, the fuel system pressure should be checked by a Ford dealer at the earliest opportunity.
See also:
Heater unit - overhaul
1 With the heater unit removed from the
vehicle, remove the two securing screws and
withdraw the heater matrix from the casing
(see illustrations).
19.1a Remove the securing screws . . .
19.1 ...
Master cylinder - removal, overhaul and refitting
Note: Before starting work, refer to the
warning at the beginning of Section 3
concerning the dangers of hydraulic fluid.
Removal
1 Disconnect the leads from the level warning
switch in the reser ...
Fuel computer components - removal and refitting
Computer unit
Removal
1 Disconnect the battery negative terminal.
2 Undo the two instrument panel bezel
retaining screws and ease the bezel out to
release the lower clips.
3 Withdraw the compute ...
