Alternator - removal and refitting
Note: Refer to the precautions at the end of Section 1 before proceeding.
Removal
1 The operations are similar for all makes of
alternator.
2 Disconnect the battery negative terminal, then disconnect the multiplug or leads from the rear of the alternator.
3 On certain CVH engine models it may be necessary to remove the air cleaner hose, and disconnect the radiator bottom hose to give sufficient clearance to enable removal of the alternator, in which case the cooling system must be drained with reference to Chapter 1.
4 Release the mounting and adjuster link bolts, push the alternator in towards the engine and remove the drivebelt (see illustration). It may be necessary to remove the adjuster link-to-alternator bolt to facilitate removal of the drivebelt.
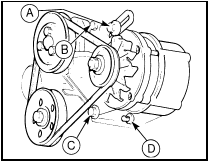
5.4 Alternator mounting and adjuster link bolts
A Adjuster link-to-alternator bolt B Adjuster link-to-engine bolt C and D Alternator mounting bolts
5 Undo and remove the mounting nuts and bolts and adjuster link bolt, if not already removed, and withdraw the alternator from the engine.
Refitting
6 Refitting is the reverse sequence to
removal, bearing in mind the following points.
a) Ensure that the mounting bolts and washers are assembled as shown (see illustrations).
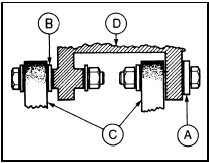
5.6a Correct fitting of alternator mounting components - early models
A Large washer
B Small washer (pre-1985 CVH engines only)
C Mounting bracket
D Alternator
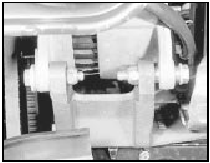
5.6b Alternator mounting bolt arrangement - later models
b) Adjust the drivebelt tension as described in Chapter 1.
c) On completion, where applicable, refill the cooling system as described in Chapter 1.
See also:
Door inner trim panel - removal and refitting
Front door
Models up to 1987
1 On models with manually-operated
windows, prise the cover from the window
regulator handle, note the position of the
handle with the window fully shut, then
remove ...
Inner gutter weatherstrip (Saloon, Hatchback and Estate models) - removal
and refitting
Removal
1 Open both the front and rear doors to
expose the relevant weatherstrip.
2 Carefully pull the weatherstrip from the
base of the front pillar, taking care to release
the flap which is stu ...
Engine - complete dismantling
1 The need for dismantling will have been
dictated by wear or noise in most cases.
Although there is no reason why only partial
dismantling cannot be carried out to renew
such items as the oil pum ...
