Handbrake cables - renewal
1 Chock the front wheels, then fully release the handbrake.
2 Raise and support the vehicle at the rear with axle stands (see “Jacking and Vehicle Support”).
Primary cable
3 Extract the spring clip and clevis pin and
disconnect the primary cable from the
equaliser (see illustrations).
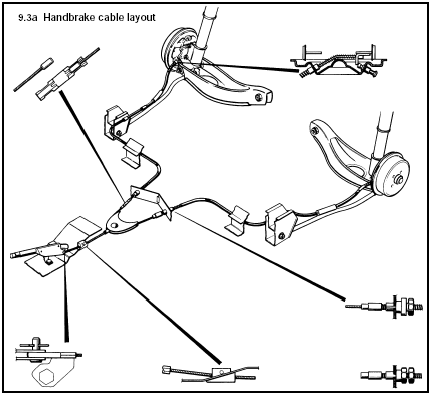
9.3a Handbrake cable layout
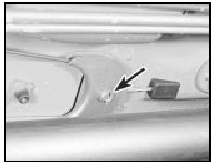
9.3b Primary cable-to-equaliser clevis pin and spring clip (arrowed)
4 Working inside the vehicle, disconnect the cable from the hand-brake control lever, again by removal of clip and pin. Drift out the cable guide to the rear and withdraw the cable through the floorpan.
5 Refitting is a reversal of removal. Adjust the handbrake, if necessary, as described in Section 8.
Secondary cable
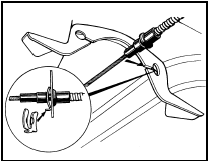
6 Using the procedure described in Section
8, slacken the cable adjusting nut so that the
abutment sleeve can be disengaged from its
body guide (see illustration).
9.6 Removing handbrake cable abutment sleeve from the body guide
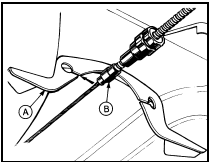
A Body guide B Secondary cable
7 Release the cable connector from its body guide by extracting the spring clip and passing the inner cable through the slit in the guide (see illustration).
9.7 Handbrake cable connector spring clip removal
8 Now disconnect the cable from its body guide on the right-hand side of the vehicle.
9 Separate the cable assembly/equaliser from the primary cable by extracting the spring clip and clevis pin.
10 Release the cable from the body guides.
11 Remove the rear roadwheels and the brake drums.
12 Release the shoe hold-down spring so that the shoe can be swivelled and the handbrake lever unclipped from the relay lever.
13 Remove the cable ends through the brake backplate and withdraw the complete cable assembly from the vehicle.
14 Refitting is a reversal of removal. Grease the cable groove in the equaliser and adjust the handbrake, as described in Section 8.
See also:
Ignition system component check (Every 24 000 miles (40 000 km) or 2 years)
1 Before disturbing any part of the ignition
system, disconnect the battery negative lead.
2 Identify and clearly mark all HT leads before
disconnecting them from the spark plugs.
3 Refer to the a ...
Front suspension lower arm inner pivot bush - renewal
1 To improve access, raise the front of the
vehicle on ramps. Apply the handbrake.
2 Unscrew and remove the nut, washer and
pivot bolt securing the relevant lower arm to
the crossmember.
3 Remove ...
Cylinder head - removal and refitting
Carburettor engines
Removal
Note: The cylinder head must only be
removed when the engine is cold. New
cylinder head bolts and a new gasket must be
used on refitting.
1 Disconnect the battery ear ...
