Light laden valve (Van models) - adjustment, removal and refitting
1 The light laden valve used on Van models is a pressure regulating valve which reacts to suspension height according to vehicle load.
The valve is mounted on the underside of the vehicle above the rear axle tube and is connected to the axle by a rod (see illustration).
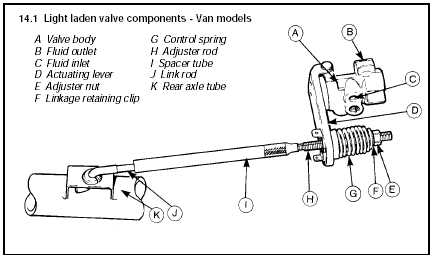
14.1 Light laden valve components - Van models
A Valve body
B Fluid outlet
C Fluid inlet
D Actuating lever
E Adjuster nut
F Linkage retaining clip
G Control spring
H Adjuster rod
I Spacer tube
J Link rod
K Rear axle tube
2 The valve should never be dismantled but it must be adjusted whenever the valve itself, the axle tube, spring or shock absorber have been removed, refitted or renewed.
Adjustment
3 Follow this adjustment procedure provided
the original roadsprings have been refitted,
but when new valve linkage has been
installed. Measure the dimension “X” and if
necessary adjust the position of the nut to
make the dimension between 10 and 12 mm
(see illustration).
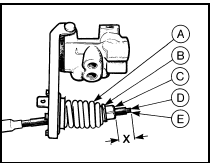
14.3 Light laden valve adjustment diagram - Van models
A Control spring
B Linkage retaining
clip
C Adjuster nut
D Threaded rod
E Flats
X = 10 to 12 mm
4 Rotate the spacer tube so that the dimension “C” is between 18.5 and 20.5 mm (see illustration). Crimp the end of the spacer tube adjacent to the knurled section of the tube to prevent the tube from rotating.
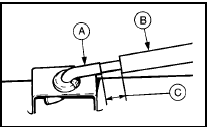
14.4 Light laden valve linkage adjustment diagram with original roadsprings -
Van models
A Link rod
B Spacer tube
C = 18.5 to 20.5 mm
5 If the original roadsprings have been refitted and also the original valve linkage, hold the threaded adjustment rod by means of its flats and turn the adjusting nut in either direction until the correct dimensions are obtained.
6 If one or both rear roadsprings have been renewed, carry out the adjustment procedure described in paragraph 3, except that the end of the spacer tube should be aligned with the groove in the link rod (see illustration).
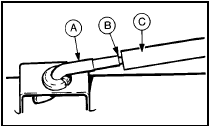
14.6 Light laden valve linkage adjustment diagram with new roadsprings - Van
models
A Link rod
B Groove
C Spacer tube
Removal
Note: Before starting work, refer to the
warning at the beginning of Section 3
concerning the dangers of hydraulic fluid.
7 If the pressure regulating valve must be removed, first disconnect the hydraulic pipelines from the valve and cap the pipes.
8 Unbolt the valve from its mounting bracket, lower the valve and slide the spacer tube assembly off the link rod. Remove the link rod.
Refitting
9 Refitting is a reversal of removal, but bleed
the brakes (Section 11) and adjust the valve
as described previously in this Section.
See also:
Thermo-time switch - removal and refitting
Removal
1 Disconnect the battery negative lead.
2 Drain the cooling system as described in
Chapter 1.
3 Raise the front of the car and support it on
axle stands (see “Jacking and Vehicle
Support ...
Maintenance - component location
Underbonnet view of a 1983 2.0 litre SOHC carburettor model (air cleaner
removed)
1 Brake fluid reservoir
2 Windscreen wiper motor
3 Battery
4 Ignition coil
5 Carburettor
6 Distributor
7 Fu ...
Speed control (if equipped)
With speed control set, you can maintain a speed of 48 km/h (30 mph)
or more without keeping your foot on the pedal. Speed control does not
work at speeds below 48 km/h (30 mph).
Do not use the spe ...
