Brake pedal - removal, refitting and adjustment
Removal
1 Working within the vehicle, remove the
under-dash cover panel.
2 Extract the spring clip which connects the pushrod to the arm of the brake pedal.
3 Extract the circlip from the end of the pedal pivot shaft and withdraw the shaft with clutch pedal and the flat and wave washers (see illustration).
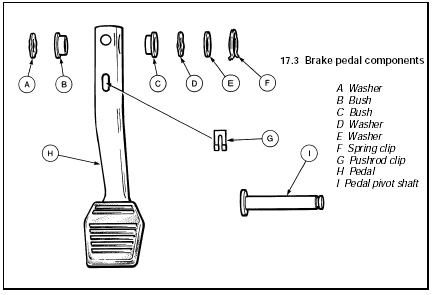
17.3 Brake pedal components
A Washer
B Bush
C Bush
D Washer
E Washer
F Spring clip
G Pushrod clip
H Pedal
I Pedal pivot shaft
4 Renew the bushes as necessary.
Refitting
5 Reassembly and refitting are reversals of
removal and dismantling. Apply a little grease
to the bushes when installing.
Adjustment
6 Although the braking system may be in
satisfactory condition generally, it is possible
that some drivers may feel that the brake
pedal travel is excessive. The travel can be
reduced in the following way if the upper
surface of the pedal pad is less than 200.0
mm above the metal surface of the floor.
7 Remove the brake pedal as described above.
8 Remove the white plastic bush (see illustration).
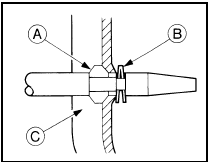
17.8 Sectional view of brake pedal and pushrod
A White plastic
bush
B Pushrod clip
C Pedal arm
9 Fit a new bush which is red in colour and will increase the pedal height. Once this type of bush has been fitted it will not be possible to refit the anti-rattle retainer. This does not matter.
10 Adjust the stop-lamp switch (Section 18).
See also:
Conversion factors
Length (distance)
Inches (in) x 25.4 = Millimetres (mm) x 0.0394 = Inches (in)
Feet (ft) x 0.305 = Metres (m) x 3.281 = Feet (ft)
Miles x 1.609 = Kilometres (km) x 0.621 = Miles
Volume (capacity)
...
Crankshaft and main bearings - removal and refitting
Note: A new crankshaft rear oil seal and a new
rear oil seal housing gasket should be used on
refitting.
Removal
1 With the engine removed from the vehicle,
remove the timing chain and crankshaft ...
Rear suspension front mounting (Saloon, Hatchback and Estate models) -
renewal
1 Chock the front wheels, jack up the rear of
the vehicle and support on axle stands placed
under the side members.
2 Unscrew and remove the three bolts
securing the relevant front guide plate to ...
