Rear shock absorber (Saloon and Estate models) - removal, testing and refitting
Removal
1 Slacken the roadwheel bolts, raise the rear
of the vehicle, support it on stands (see
“Jacking and Vehicle Support”) and remove
the roadwheel.
2 Support the suspension lower arm with a jack.
3 Open the tailgate and lift the parcel tray to expose the shock absorber top mounting (see illustration).
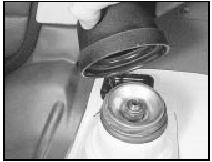
10.3 Rear shock absorber top mounting
4 Remove the cap and then unscrew the nut from the shock absorber spindle. To prevent the spindle turning, use an Allen key in the socket provided (see illustration).
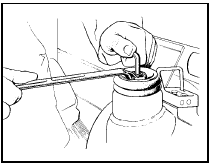
10.4 Removing the shock absorber top mounting nut - Saloon and Estate models
5 Take off the cap and insulator.
6 Separate the brake hydraulic hose from the shock absorber by slackening the centre locking nut and easing the hose and pipe down and out of the slot in the bracket (see illustration). On the right-hand side there is very little clearance for a spanner and it may be easier if the roadspring is removed as described in Section 13.
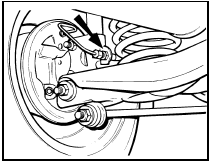
10.6 Brake hydraulic hose-to-shock absorber attachment (arrowed) - Saloon and
Estate models
7 Undo the two bolts securing the shock absorber to the stub axle carrier and withdraw the unit, together with cup and bump rubber, from under the wheel arch.
Testing
8 To test the shock absorber, grip its lower
mounting in a vice so that the unit is vertical.
9 Fully extend and retract the shock absorber ten or twelve times. Any lack of resistance in either direction will indicate the need for renewal, as will evidence of leakage of fluid.
Refitting
10 Refitting is a reversal of removal, but if a
new unit is being installed, prime it first in a
similar way to that described for testing.
See also:
Distributor lubrication - models with contact breaker
distributor (Every 6000 miles or 6 months)
1 Remove the distributor cap and the rotor
arm.
2 Apply a couple of drops of light oil to the
felt pad in the top of the shaft.
3 Wipe clean the distributor cam, then apply
a trace of high meltin ...
Coolant renewal (Every 24 000 miles or 2 Years)
Cooling system draining
1 It is preferable to drain the system when the
coolant is cold. If it must be drained when hot,
release the pressure cap on the thermostat
housing (or expansion tank on la ...
Heater - removal and refitting
Removal
1 Disconnect the battery negative lead.
2 Refer to Chapter 11 and remove the centre
console.
3 Working within the engine compartment,
disconnect the coolant hoses from the heater
pipe st ...
