Tailgate - removal and refitting
Removal
1 Remove the trim panel (Section 32).
2 Disconnect the wiring from the heated rear window element, radio aerial, wiper motor tailgate speakers and tailgate lock motor as applicable (see illustration).
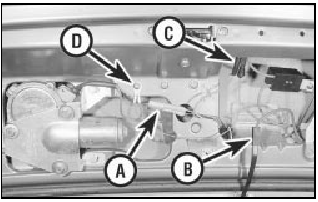
15.2 Electrical connections at the tailgate (1986 model shown)
A Wiper motor
B Radio aerial connection
C Feed and relay connectors
D Earthing point
3 Tie a strong cord to the end of each separate wiring loom. Pull out the flexible grommets and withdraw the wiring looms until the cords appear. Untie the looms, leaving the cords in the tailgate.
4 Repeat this procedure for the washer supply pipe.
5 With an assistant supporting the tailgate, prise off the stout clips or release the pegs and disconnect the support struts from the tailgate (see illustration).
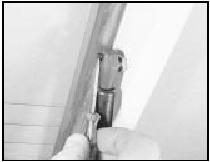
15.5 Releasing tailgate strut retaining clip
6 From the top edge of the tailgate aperture, remove the weatherstrip. Release the headlining clips from the flange.
7 Undo the screws and remove the pillar trim on each side, then pull the headlining down for access to the hinge bolts.
8 With the tailgate supported, undo the nuts from the hinge bolts and remove the tailgate.
Refitting
9 Refitting is a reversal of removal. Adjust the
position of the tailgate in the aperture at the
hinge bolts and the closing action at the
striker plate.
See also:
General information
All models utilise a light alloy inlet manifold
which on carburettor models is coolant
heated to improve the atomisation of the
fuel/air mixture.
The exhaust manifold is of cast iron
construction ...
Idle speed compensator - removal and refitting
Removal
1 The idle speed compensator is only fitted to
K-Jetronic systems from 1986 onwards and is
located in the centre of the engine
compartment bulkhead (see illustration).
19.1 K-Jetronic s ...
Ignition timing check - models with contact breaker distributor
(Every 6000 miles or 6 months)
Note: With modern ignition systems the only
suitable way to time the ignition accurately is
with a stroboscopic timing light. However, for
initial setting up purposes (ie after major
overhaul, or ...
