Master cylinder - removal, overhaul and refitting
Note: Before starting work, refer to the warning at the beginning of Section 3 concerning the dangers of hydraulic fluid.
Removal
1 Disconnect the leads from the level warning
switch in the reservoir cap. Remove the cap.
2 Syphon out as much fluid as possible from the master cylinder reservoir using an old battery hydrometer or a poultry baster. Do not drip the fluid onto the paintwork as it will act as an effective paint stripper.
3 Disconnect the pipelines from the master cylinder by unscrewing the unions.
Additionally on models equipped with the anti-lock braking system, release the clips and disconnect the two modulator fluid return pipes.
4 On non-servo models release the retaining clip securing the master cylinder pushrod to the brake pedal (see illustration).
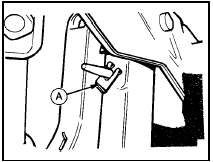
12.4 Master cylinder push rod-to-pedal retaining clip (A) - non-servo models
5 Unbolt the master cylinder unit from the servo unit or bulkhead, as applicable, and withdraw it.
Overhaul
6 Clean away external dirt and then detach
the fluid reservoir by tilting it sideways and
gently pulling. Remove the two rubber seals
(see illustration).
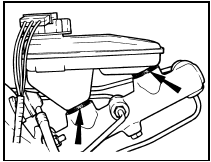
12.6 Master cylinder reservoir rubber seals (arrowed)
7 Secure the master cylinder carefully in a vice fitted with jaw protectors.
8 Unscrew and remove the piston stop bolt.
9 Pull the dust excluder back and, using circlip pliers, extract the circlip which is now exposed (see illustration).
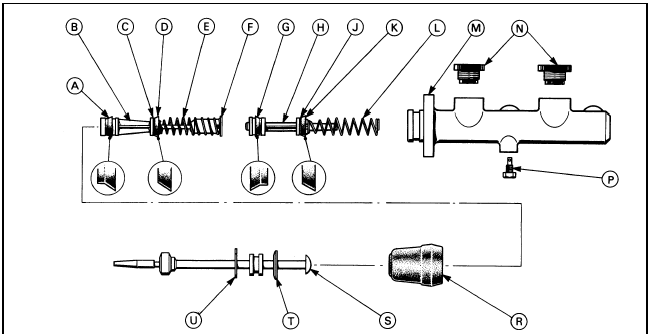
12.9 Exploded view of the master cylinder
A Seal
B Primary piston
C Shim
D Seal
E Spring
F Retainer
G Seal
H Secondary piston
J Shim
K Seal
L Spring
M Cylinder body
N Reservoir seals
P Piston stop bolt
R Boot
S Pushrod
T Washer
U Circlip
10 Remove the pushrod, dust excluder and washer.
11 Withdraw the primary piston assembly, which will already have been partially ejected.
12 Tap the end of the master cylinder on a block of wood and eject the secondary piston assembly.
13 Examine the piston and cylinder bore surface for scoring or signs of metal-to-metal rubbing. If evident, renew the cylinder complete.
14 Where the components are in good condition, dismantle the primary piston by unscrewing the screw and removing the sleeve. Remove the spring, retainer, seal and shim. Prise the second seal from the piston (see illustration).
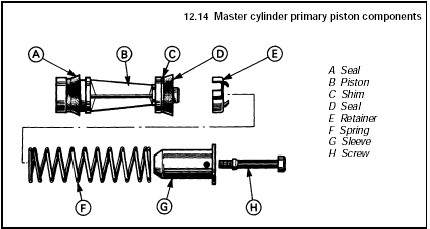
12.14 Master cylinder primary piston components
A Seal
B Piston
C Shim
D Seal
E Retainer
F Spring
G Sleeve
H Screw
15 Dismantle the secondary piston in a similar way (see illustration).
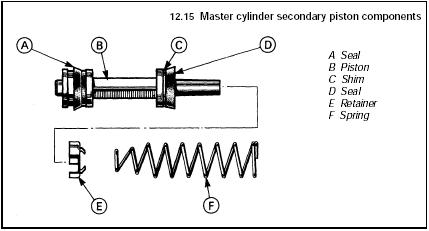
12.15 Master cylinder secondary piston components
A Seal
B Piston
C Shim
D Seal
E Retainer
F Spring
16 Discard all seals and obtain a repair kit.
17 Cleaning of components should be done in brake hydraulic fluid or methylated spirit - nothing else.
18 Using the new seals from the repair kit, assemble the pistons, making sure that the seal lips are the correct way round.
19 Dip the piston assemblies in clean hydraulic fluid and enter them into the cylinder bore.
20 Fit the pushrod complete with new dust excluder and secure with a new circlip.
21 Engage the dust excluder with the master cylinder.
22 Depress the pushrod and screw in the stop bolt.
23 Locate the two rubber seals and push the fluid reservoir into position.
24 It is recommended that a small quantity of fluid is now poured into the reservoir and the pushrod operated several times to prime the unit.
Refitting
25 Refit the master cylinder by reversing the
removal operations.
26 Bleed the complete hydraulic system on completion of work (see Section 11 or 23 as applicable).
See also:
Instrument panel components - removal and refitting
1 Remove the instrument panel.
Panel illumination and warning
lamp bulbs
2 Twist the relevant bulbholder anticlockwise
and withdraw it from the printed
circuit board on the rear of the instrument ...
Rear hub bearings - renewal
1 Raise and support the rear of the vehicle on
stands (see “Jacking and Vehicle Support”).
Remove the roadwheel and release the
handbrake.
2 On fuel-injected models and Van versions
undo the reta ...
Clock - removal and refitting
Facia mounted clock
Removal
1 Remove the instrument panel (Section 9).
2 Undo the screws around the edge of the
instrument panel at the rear and separate the
two panel halves.
3 Undo the nuts an ...
