Spark plug renewal (Every 12 000 miles (20 000 km) or 12 months)
1 The correct functioning of the spark plugs is vital for the correct running and efficiency of the engine. It is essential that the plugs fitted are appropriate for the engine.
2 Make sure that the ignition is switched off before inspecting the HT leads to see if they carry their cylinder numbers. Note that the position of No 1 cylinder HT lead in the distributor cap is marked with either a pip, or a number “1 “.
3 Where necessary, for improved access remove the air cleaner and/or the inlet hose.
4 Disconnect the leads from the plugs by pulling on the connectors, not the leads.
5 On 2.0 litre DOHC carburettor models, the location of the spark plugs and the close proximity of the carburettor makes spark plug access difficult, particularly when removing the plugs from cylinders 2 and 3. It is suggested that a 3/8 inch ratchet drive spark plug socket with rubber insert and long extension bar is used, possibly in conjunction with a universal joint adapter. It is also advisable to disconnect No 3 cylinder HT lead from the distributor first, to allow some slack for disconnection at the spark plug.
6 Clean the area around each spark plug using a small brush, then using a plug spanner (preferably with a rubber insert), unscrew and remove the plugs (see illustration).
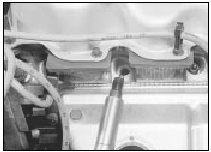
20.6 Removing a spark plug - CVH engine
Cover the spark plug holes with a clean rag to prevent the ingress of any foreign matter.
7 Before fitting new spark plugs, check that the threaded connector sleeves are tight. As the plugs incorporate taper seats, make sure that the threads and seats are clean.
8 On DOHC models before refitting the spark plugs, coat their threads with suitable antiseize compound, taking care not to contaminate the electrodes.
9 Screw in the spark plugs by hand, then tighten them to the specified torque. Do not exceed the torque figure.
10 Push the HT leads firmly onto the spark plugs, and where applicable refit the air cleaner and/or inlet hose.
See also:
Deceleratio sensitive valve (all models with conventional braking system) - removal and refitting
Caution: Refer to the precautions in Section 1.
Removal
1 The deceleration sensitive valve is located on the left-hand side of the engine compartment (see illustrations).
23.1a Early type decele ...
Engine - removal leaving manual gearbox in vehicle
Note: A suitable hoist and lifting tackle will be
required for this operation.
1.8 litre (R2A type)
1 Disconnect the battery negative lead.
2 Remove the bonnet.
3 Remove the air cleaner.
4 Disco ...
Throttle cable - adjustment, removal and refitting
Adjustment
1 Disconnect the battery earth lead.
2 On manual transmission models remove
the air cleaner unit, as given in Section 2.
3 Get an assistant to sit in the driving seat
and fully depress ...
