Steering and suspension security check (Every 12 000 miles (20 000 km) or 12 months)
1 Check the shock absorbers by bouncing the vehicle up and down at each corner in turn. When released, it should come to rest within one complete oscillation. Continued movement, or squeaking and groaning noises from the shock absorber suggests that renewal is required .
2 Raise and support the vehicle. Examine all steering and suspension components for wear and damage. Pay particular attention to dust covers and gaiters, which if renewed promptly when damaged can save further damage to the component protected.
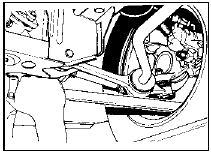
3 At the same intervals, check the front suspension lower arm balljoints for wear by levering up the arms (see illustration).

29.3 Levering up lower arm to check balljoint for wear
Balljoint free movement must not exceed 0.5 mm (0.02 in). The track rod end balljoints can be checked in a similar manner, or by observing them whilst an assistant rocks the steering wheel back and forth. If the lower arm balljoint is worn, the complete lower arm must be renewed .
4 Wheel bearings can be checked for wear by spinning the relevant roadwheel. Any roughness or excessive noise indicates worn bearings, which must be renewed, as no adjustment is possible. It is unlikely that any wear will be evident unless the vehicle has covered a very high mileage. It should be noted that it is normal for the bearings to exhibit slight endfloat, which is perceptible as wheel rock at the wheel rim.
Driveshaft check (Every 12 000 miles (20 000 km) or 12 months)
1 Position the vehicle over a pit, or raise it at front and rear on ramps or axle stands (see “Jacking and vehicle support”).
2 Examine the driveshaft joint rubber gaiters.
Flex the gaiters by hand and inspect the folds and clips. Damaged or leaking gaiters must be renewed without delay to avoid damage occurring to the joint itself 3 Check the tightness of the final drive mounting bolts and the driveshaft flange screws.
Underbody inspection (Every 12 000 miles (20 000 km) or 12 months)
1 Except on vehicles with a wax-based underbody protective coating, have the whole of the underframe of the vehicle steamcleaned, engine compartment included, so that a thorough inspection can be carried out to see what minor repairs and renovations are necessary.
2 Steam-cleaning is available at many garages and is necessary for the removal of the accumulation of oily grime which sometimes is allowed to become thick in certain areas. If steam-cleaning facilities are not available, there are some excellent grease solvents available which can be brushapplied; the dirt can then be simply hosed off.
3 After cleaning, position the vehicle over a pit, or raise it at front and rear on ramps or axle stands (see “Jacking and vehicle support”).
4 Using a strong light, work around the underside of the vehicle, inspecting it for corrosion or damage. If either is found, refer to Chapter 12 for details of repair.
Brake pipe and hose check (Every 12 000 miles (20 000 km) or 12 months)
Periodically inspect the rigid brake pipes for rust and other damage, and the flexible hoses for cracks, splits or “ballooning”. Have an assistant depress the brake pedal (ignition on) and inspect the hose and pipe unions for leaks.
Renew any defective item without delay.
Idle speed linkage clean (Every 12 000 miles (20 000 km) or 12 months)
On carburettor models which incorporate a stepper motor (ie. Weber 2V from 1985), good electrical contact between the motor plunger and the adjusting screw is essential to maintain a regular idle speed.
Clean the plunger and adjusting screw contact faces with abrasive paper followed by switch cleaning fluid. Switch cleaning fluid is available from electronic component shops.
See also:
Manual heating and air conditioning system (if equipped)
Fan speed control
Controls the volume of air circulated
in the vehicle.
Temperature control knob
Controls the temperature of the
airflow inside the vehicle.
Mode Selector Control
Control ...
Alternator - removal and refitting
Note: Refer to the precautions at the end of
Section 1 before proceeding.
Removal
1 The operations are similar for all makes of
alternator.
2 Disconnect the battery negative terminal,
then disco ...
Fuel filler flap - removal and refitting
Removal
1 Open the filler flap and the tailgate or boot
lid, as applicable.
2 Remove the fuel filler cap and then remove
the screw securing the filler housing to the
fuel tank neck (see illustrat ...
