Throttle cable - removal, refitting and adjustment
Removal
1 Disconnect the battery negative lead.
2 Working inside the vehicle, remove the lower facia panel from the driver’s side.
3 Prise off the securing clip and disconnect the end of the throttle cable from the top of the pedal.
4 Working in the engine compartment, free the cable sheath from the bulkhead, and pull the cable through into the engine compartment. It will probably be necessary to pull the cable grommet from the bulkhead in order to free the cable sheath.
5 For improved access, remove the air cleaner.
6 Disconnect the cable end from the throttle linkage. The cable end may be attached to the linkage with a balljoint and spring clip, a spring clip only, or the cable end may simply locate in a slot in the throttle lever (see illustration).
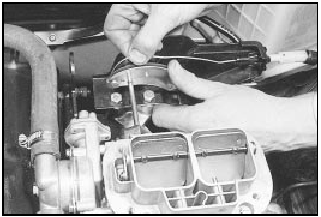
12.6 Disconnecting the throttle cable end from the throttle lever - Weber 2V
carburettor
7 Prise off the spring clip securing the cable sheath to the cable bracket at the carburettor inlet manifold. Depress the four lugs on the plastic cable retainer simultaneously so that the retainer can be slid from the bracket, or remove the retainer securing clip, as applicable (see illustration). Take care not to damage the cable sheath.
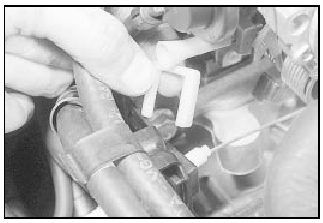
12.7 Removing the throttle cable sheath retainer securing clip - CVH model
Refitting
8 Refitting is a reversal of removal, but before
refitting the air cleaner, adjust the cable as
follows.
Adjustment
9 Have an assistant fully depress the throttle
pedal and hold it in this position. On models
with automatic transmission, where
applicable ensure that the kickdown cable
does not restrict the pedal movement. Turn
the adjusting sleeve at the carburettor inlet
manifold cable bracket until the throttle is just
fully open. Have the assistant release and
then fully depress the throttle pedal, and
check that the throttle is again fully open.
Adjust if necessary, then refit the air cleaner.
On models with automatic transmission, where applicable check the operation of the kickdown cable, and adjust if necessary.
See also:
Starting
Positions of the ignition
1. LOCK, locks the steering wheel,
gearshift lever (automatic transaxle
only) and allows key removal. On
vehicles with a manual transaxle
push the key in while turning t ...
Diagram 3a: 1986-on Ancilliary circuits all models
Diagram 3a: 1986-on Ancilliary circuits all models ...
Steering intermediate shaft and flexible coupling - removal and refitting
Removal
1 Apply the handbrake, jack up the front of
the vehicle and support on axle stands.
2 Working in the engine compartment,
unscrew the bolt securing the intermediate
shaft to the inner colu ...
