Water pump - removal and refitting
OHV engines Note: A new gasket and suitable jointing compound must be used on refitting.
Removal
1 Drain the cooling system as described in
Chapter 1.
2 Slacken the three water pump pulley retaining bolts. Any tendency for the pulley to turn as the bolts are undone can be restrained by depressing the top run of the drivebelt.
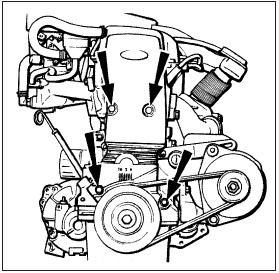
3 Release the alternator mounting and adjustment arm bolts, push the alternator in towards the engine and slip the drivebelt off the pulleys.
4 Unscrew the previously slackened pulley bolts and remove the pulley.
5 Release the clip and disconnect the hose at the pump outlet.
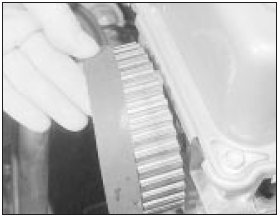
6 Unscrew the three retaining bolts and remove the pump from the cylinder block (see illustration).
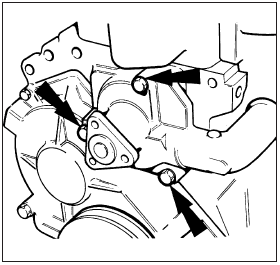
5.6 Water pump retaining bolts - OHV engines
7 Peel away the old gasket from the cylinder block and thoroughly clean the mating face.
8 No provision is made for repair of the water pump and if the unit is leaking, noisy, or in any way unserviceable, renewal will be necessary.
Refitting
9 Refitting is the reverse sequence to
removal. Use a new gasket lightly smeared
with jointing compound and tighten the
retaining bolts to the specified torque.
10 Refill the cooling system, and adjust the drivebelt tension as described in Chapter 1.
CVH engines
Note: The following procedure entails the use
of special tools to tension the timing belt after
refitting the water pump. Read through the
entire Section to familiarise yourself with the
procedure and refer also to Chapter 2. A new
gasket and suitable jointing compound must
be used on refitting.
Removal
11 Drain the cooling system as described in
Chapter 1.
12 On carburettor engines refer to Chapter 4 and remove the air cleaner to improve access.
13 Slacken the alternator mounting and adjustment arm bolts, push the alternator in towards the engine and slip the drivebelt off the pulleys.
14 Using a spanner on the crankshaft pulley bolt, turn the crankshaft until the notch on the pulley is aligned with TDC (O) mark on the timing belt cover scale (see illustration). Now remove the distributor cap and check that the rotor arm is pointing towards the No 1 cylinder HT lead segment in the cap. If the rotor arm is pointing towards No 4 cylinder segment, turn the crankshaft through another complete turn and realign the pulley notch with the TDC mark.
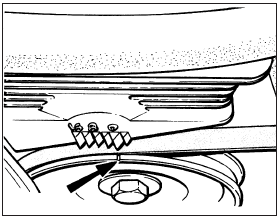
5.14 Crankshaft pulley notch aligned with TDC (O) mark on timing belt cover
scale - CVH engines
15 On early models unscrew the four bolts and remove the one-piece timing belt cover (see illustration). On later models fitted with a two-piece cover, unscrew the two upper bolts and remove the top half, then unscrew the two lower bolts. The lower half cannot be removed at this stage.
5.15 Timing belt cover retaining bolts - early CVH engine models with
one-piece cover
16 Using a dab of quick drying paint, mark the teeth of the timing belt and their notches on the sprockets so that the belt can be engaged in its original position on reassembly.
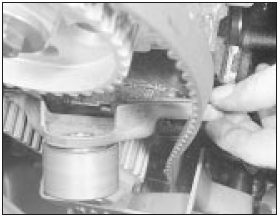
17 Slacken the two timing belt tensioner retaining bolts and slide the tensioner sideways to relieve the tautness of the belt (see illustration). If the tensioner is springloaded, tighten one of the bolts to retain it in the slackened position.
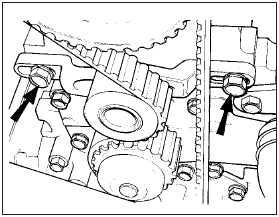
5.17 Timing belt tensioner retaining bolts - CVH engines
18 Slip the timing belt off the camshaft, tensioner and water pump sprockets (see illustration).
5.18 Removing the timing belt from the camshaft sprocket - CVH engine
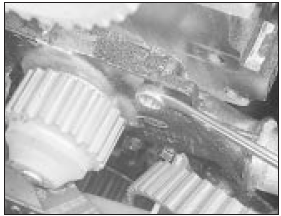
19 Remove the bolts and lift off the tensioner and, where fitted, the tensioning spring (see illustration).
5.19 Removing the timing belt tensioner - CVH engine
20 Slacken the clips and disconnect the hoses at the water pump.
21 Undo the four bolts and remove the pump from the cylinder block face (see illustrations).
5.21a Undo the four bolts . . .
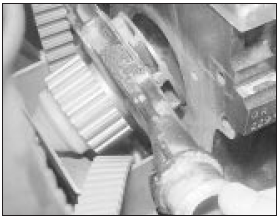
5.21b . . . and remove the water pump - CVH engine
22 Renewal of the pump will be necessary if there are signs of water leakage, roughness of the bearings, or excessive side play or endfloat at the sprocket. From 1983 onwards a revised water pump was introduced in conjunction with a two-piece timing belt cover. If a water pump is being renewed on an early model with one-piece belt cover, then it will also be necessary to obtain a replacement kit. This kit contains a modified belt cover and related parts to suit the later type pump which is now the only type supplied.
Refitting
23 Scrape away all traces of old gasket and
ensure that the mating faces are clean and
dry.
24 Lightly smear jointing compound on both sides of a new gasket and locate the gasket on the cylinder block face.
25 Place the pump in position, then fit and tighten the bolts to the specified torque.
26 Fit the timing belt tensioners (and spring where applicable), but only tighten the bolts finger tight at this stage.
27 Refer to Chapter 2, and refit and tension the timing belt.
28 Refit the hoses to the water pump.
29 Refit the timing belt cover(s).
30 Refit the alternator drivebelt and adjust its tension as described in Chapter 1.
31 On carburettor engines, refit the air cleaner.
32 Refill the cooling system as described in Chapter 1.
See also:
Front suspension strut - removal, overhaul and refitting
Removal
1 Slacken the roadwheel bolts, raise the front
of the vehicle and support it securely on
stands (see “Jacking and Vehicle Support”),
then remove the roadwheel.
2 Support the underside of ...
AM/FM radio with compact disc player
Volume/power control
Ensure that the ignition switch is in
the ACC or ON position.
Press the control to turn the audio
system on. Turn the control to raise
or lower the volume.
Press the ...
Bumper components - removal and refitting
Bumper overriders
Removal
1 On pre-1986 models the overrider is held to
the bumper by a clamp screw. Find this screw
on the underside of the bumper and release it
- the overrider can then be with ...
