
Throttle valve control motor (1.6 and 1.8 litre (R6A type) CVH) - removal and refitting
1.6 litre
1 Disconnect the battery negative lead.
2 Remove the air cleaner.
3 Disconnect the wiring connectors from the throttle valve control motor, and the throttle position sensor, pulling on the plugs, not on the wiring (see illustration).
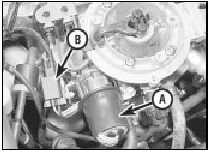
28.3 Throttle valve control motor (A) and wiring plug (B)
4 Remove the three screws securing the motor and the throttle position sensor assembly mounting bracket to the CFI unit, and withdraw the assembly.
5 Remove the three motor securing screws, and withdraw the motor from the bracket.
6 Refitting is a reversal of removal, bearing in mind the following points.
7 Ensure that the throttle position sensor actuating arm locates correctly on the throttle valve spindle, and that the mounting bracket aligns with its locating pegs.
8 On completion, the idle speed should be checked by a Ford dealer at the earliest opportunity.
1.8 litre
9 Disconnect the battery negative lead.
10 Remove the air cleaner assembly.
11 Disconnect the wiring connector from the throttle valve control motor.
12 Remove the three screws securing the motor and the mounting bracket to the CFI unit, and withdraw the assembly.
13 Remove the three motor securing screws, and withdraw the motor from the bracket.
14 Refitting is a reversal of removal, ensuring that the motor is located on the throttle linkage, and that the bracket and locating pegs are aligned.
See also:
Rear coil spring (Saloon, Hatchback and Estate models) - removal and
refitting
Models with rear drum brakes
1 Remove the relevant driveshaft.
2 Unscrew the brake pipe from the brake
hose at the bracket on the vehicle underbody.
Plug the ends of the pipe and hose to prevent
...
Rear disc caliper - removal, overhaul and refitting
Note: Complete dismantling of the rear caliper
should not be attempted unless Ford spring
compressor (tool No 12-007) is available, or
unless the problems likely to arise in the
absence of the too ...
Steering gear bellows - renewal
1 At the first indication of a split or grease
leakage from the bellows, renew them.
2 Loosen off the roadwheel bolts, raise the
front of the vehicle and support it on stands
(see “Jacking and Veh ...
