Exhaust gas oxygen (HEGO) sensor (2.0 litre DOHC/1.6 & 1.8 litre (R6A type) CVH) - removal and refitting
Note: Do not touch the tip of the HEGO sensor as this will drastically shorten its service life.
Note: A new sealing ring should be used on refitting.
Removal
1 Ensure that the engine and the exhaust
system are cold.
2 Disconnect the battery negative lead.
3 Apply the handbrake, then jack up the front of the vehicle, and support it securely on axle stands (see “Jacking and Vehicle Support”).
4 Disconnect the sensor wiring plug halves by releasing the locktabs and pulling on the plug halves, not the wiring.
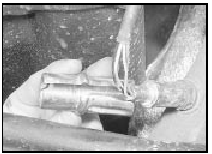
5 Where fitted, slide the heat shield from the sensor (see illustration).

35.5 Sliding the heat shield from the exhaust gas oxygen sensor
6 Unscrew the sensor from the exhaust downpipe, and recover the sealing ring. Do not touch the tip of the sensor if it is to be refitted.
Refitting
7 Commence refitting by ensuring that the
sensor threads and the corresponding
threads in the downpipe are clean.
8 Refit the sensor using a new sealing ring, and tighten it to the specified torque.
9 Further refitting is a reversal of removal, but on completion start the engine, and check for leaks around the sensor sealing ring.
See also:
Intensive maintenance
If, from the time the vehicle is new, the
routine maintenance schedule is followed
closely and frequent checks are made of fluid
levels and high wear items, as suggested
throughout this manual, th ...
Ford Escort Service and Repair Manual
Routine maintenance and servicin
...
Carburettor (Weber 2V TLD) - removal and refitting
Caution: Refer to the
precautions in Section 1 before
proceeding.
Note: A new gasket must be used when
refitting the carburettor. A tachometer and an
exhaust gas analyser will be required to chec ...
