Alternator - removal and refitting
Removal
1 Disconnect the battery leads.
2 Disconnect the multi-plug, or disconnect the wires from their terminals on the rear of the alternator, noting their locations (as applicable), then slacken the mounting and adjustment bolts and tilt the alternator towards the engine (see illustrations).
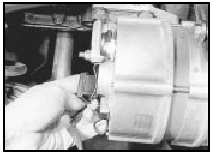
4.2a Disconnecting the multi-plug from a Bosch alternator
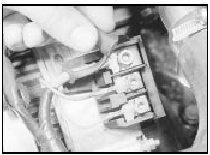
4.2b Removing the insulating cap from the main wiring terminal on a Lucas
A127 alternator (CVH model)
3 Remove the drivebelt(s) from the alternator pulley(s).
4 Remove the mounting and adjustment nuts and bolts, and withdraw the alternator from the engine.
Refitting
5 Refitting is a reversal of removal, noting the
following points.
6 To avoid breakage of the alternator mounting bracket lugs, it is important that the following procedure is adhered to when refitting the mounting bolts.
7 Always refit the large flat washer (A) (see illustration).

4.7 Alternator mounting bracket arrangement
A Large flat washer B Small flat washer (models up to 1985 only) C Mounting bracket (engine) D Mounting lugs (alternator)
8 Earlier models (before 1985) also have a small washer (B) which must be fitted between the sliding bush and the mounting bracket.
9 Ensure that the bushes and bolts are assembled as shown - except on 2.0 litre DOHC models where a through-bolt is used, then tension the drivebelt(s) and tighten the mounting and adjustment bolts as shown in the relevant illustration in Chapter 3.
Alternator drivebelt(s) - checking, renewal and tensioning
Refer to Chapter 1, Section 21.
See also:
Auxiliary warning system components - location, testing, removal and
refitting
Location
1 The AWS control unit, and (when fitted) the
bulb failure monitor, are located behind the
glovebox on models up to 1987.
2 On models from 1987, the control and bulb
failure modules are ...
Pistons and connecting rods - examination and renovation
1 Examine the pistons for ovality, scoring,
and scratches. Check the connecting rods for
wear and damage. The connecting rods carry
a letter indicating their weight class; all the
rods fitted must ...
Radio aerial (exteriormounted) - removal and refitting
1 On models fitted with an electric aerial,
disconnect the battery negative lead.
Saloon and Estate models
2 Remove the right-hand side trim panel from
the luggage compartment.
3 Working outside ...
