Starter motor - brush renewal
Bosch long frame and JF, and
Cajavec types
1 With the starter motor removed from the
vehicle and cleaned, grip the unit in a vice
fitted with soft jaw protectors.
2 Remove the two screws securing the commutator end housing cap, then remove the cap and rubber seal (see illustration).
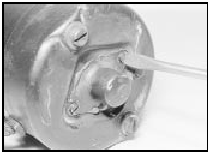
10.2 Remove the commutator end housing cap securing screws - Bosch long frame
starter motor
3 Wipe any grease from the armature shaft, and remove the C-clip, or E-clip, as applicable, and shims from the end of the shaft (see illustrations).
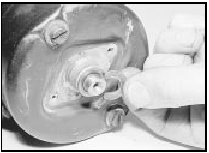
10.3a Remove the C-clip . . .
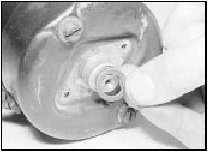
10.3b . . . and shims from the end of the armature shaft - Bosch long frame
starter motor
4 Unscrew the two nuts and remove the washers, or remove the securing screws (as applicable), then lift off the commutator end housing (see illustrations).
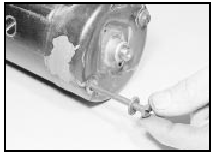
10.4a Remove the commutator end housing securing screws - Bosch long frame
starter motor
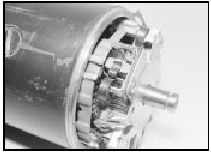
10.4b Commutator end housing removed to expose brush plate - Bosch long frame
starter motor
5 Carefully prise the thrust retaining springs from their locations, then slide the brushes from the brush plate.
6 If the brushes have worn to less than the specified minimum, renew them as a set. To renew the brushes, cut the leads at their midpoint and make a good soldered joint when connecting the new brushes.
7 The commutator face should be clean and free from burnt spots. Where necessary burnish with fine glass paper (not emery) and wipe with a fuel-moistened cloth.
8 On starter motors where the commutator end housing is secured by nuts and washers, position the brush plate over the end of the armature, with the cut-outs in the brush plate aligned with the end housing securing studs.
9 On starter motors where the commutator end housing is secured by screws, position the brush plate over the end of the armature with the cut-outs in the brush plate aligned with the loops in the field windings (see illustration). The brush plate will be positively located when the commutator end housing screws are fitted.
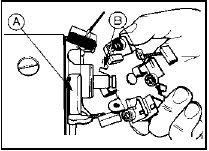
10.9 Align the cut-outs in the brush plate (B) with the loops in the field
windings (A) - Bosch long frame starter motor
10 Position the brushes in their respective locations in the brush plate, and fit the brush retaining springs.
11 Guide the commutator end housing into position, at the same time sliding the rubber insulator into the cut-out in the housing.
Secure the commutator end housing with the nuts and washers or screws, as applicable.
12 Fit sufficient shims to the end of the armature shaft to eliminate endfloat when the C-clip or E-clip, as applicable is fitted, then fit the clip.
13 Fit the armature shaft bearing seal to the commutator end housing, then apply a little lithium-based grease to the end of the armature shaft and refit the end housing cap, securing with the two screws.
Bosch short frame, EV and EF
types
14 To remove and refit the brush assembly,
proceed as for the Bosch long frame except
for the following (see illustration):
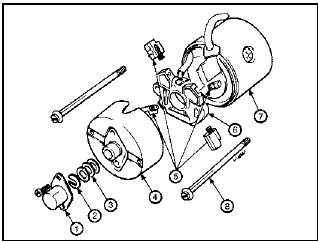
10.14 Bosch EV starter motor brush assembly
1 Commutator end housing cap
2 C-clip
3 Shims
4 Commutator end housing
5 Brushes
6 Brush plate
7 Yoke
8 Commutator end housing screw
15 Release the brush holders complete with brushes by pushing the brush holders towards the commutator and unclipping them from the brush plate. Withdraw the brush plate.
16 To renew the brushes, the leads must be unsoldered from the terminals on the brush plate, and the leads of the new brushes must be soldered to the terminals.
17 To refit the brush assembly, position the brush plate over the end of the armature shaft, then assemble the brush holders, brushes and springs, ensuring that the brush holder clips are securely located. The brush plate will be housing screws are fitted.
Bosch DM and DW types
18 The procedure is basically as described
previously for the Bosch short frame and EF
type starter motors, except that a commutator
end plate is fitted in place of the end housing
(see illustrations).
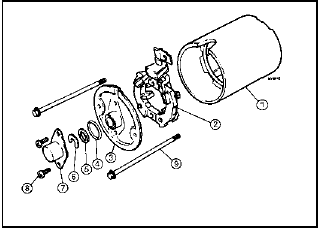
10.18a Bosch DM starter motor brush assembly
1 Yoke
2 Brush plate
3 Commutator end housing
4 Seal
5 Shim
6 C-clip
7 Commutator end housing cap
8 Securing screw
9 Commutator end housing securing screw
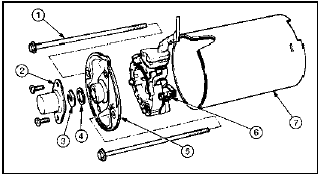
10.18b Bosch DW starter motor brush assembly
1 Commutator end plate securing screw
2 Commutator end plate cap
3 C-clip
4 Shim
5 Commutator end plate
6 Brush plate
7 Yoke
Lucas 5M90 type
Note: New star clips must be obtained for the
armature shaft on reassembly
19 With the starter motor removed from the
vehicle and cleaned, grip the unit in a vice
fitted with soft jaw protectors.
20 Remove the plastic cap from the end of the armature shaft, then remove the star clip from the end of the shaft, using a chisel at an angle of 45º to the shaft to distort the prongs of the clip until it can be removed (see illustrations).
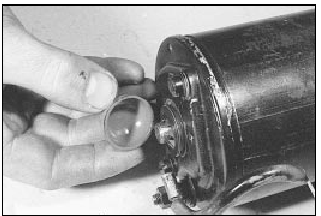
10.20a Remove the plastic cap from the end of the armature shaft . . .
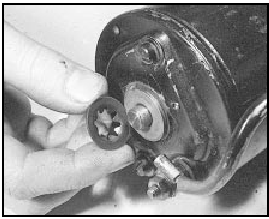
10.20b . . . followed by the star clip - Lucas 5M90 starter motor
21 Unscrew the two securing nuts and remove the connector cable from the main feed terminal (see illustration).
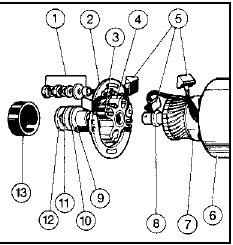
10.21 Lucas 5M90 starter motor brush assembly
1 Main terminal nuts and washers
2 Commutator end plate
3 Brush box
4 Brush spring
5 Brushes
6 Yoke
7 Armature
8 Thrustwasher
9 Commutator end plate securing screw
10 Bush
11 Thrustplate
12 Star clip
13 Plastic cap
22 Extract the two commutator end plate securing screws, and carefully tap the end plate to free it. Lift the end plate clear to allow access to the two field brushes. Disconnect the two field brushes from the brush box to allow complete removal of the commutator end plate. Take care not to damage the gasket as the end plate is removed.
23 Remove the nut, washer and insulator from the main terminal stud on the commutator end plate, then push the stud and the second insulator through the end plate and unhook the brushes.
24 To remove the brush box, drill out the rivets securing the brush box to the end plate, then remove the brush box and gasket.
25 If the brushes have worn to less than the specified minimum, renew them as a set. To renew the brushes, cut the leads at their midpoint and make a good soldered joint when connecting the new brushes.
26 The commutator face should be clean and free from burnt spots. Where necessary burnish with fine glass paper (not emery) and wipe with a fuel-moistened cloth.
27 Commence reassembly by positioning the brush box gasket on the commutator end plate, then position the brush box on the gasket and rivet the brush box to the end plate. Use a new gasket if necessary.
28 Fit the main terminal stud and insulator to the commutator end plate, then secure the stud with the remaining insulator, washer and nut. Fit the two brushes which are attached to the terminal stud into their respective locations in the brush box.
29 Fit the two field brushes into their locations in the brush box, then position the commutator end plate on the yoke and fit the two securing screws.
30 Fit a new star clip to the end of the armature shaft, ensuring that the clip is pressed home firmly to eliminate any endfloat in the armature (see illustration). Fit the plastic cap over the end of the armature shaft.
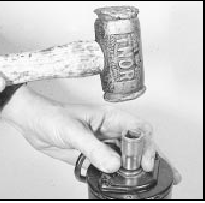
10.30 Use a soft faced hammer and socket to fit a new star clip to the end of
the armature shaft - Lucas 5M90 starter motor
Lucas 8M90 type
31 The procedure is basically as described
previously for the 5M90 type starter motor
with the following difference (see illustration):
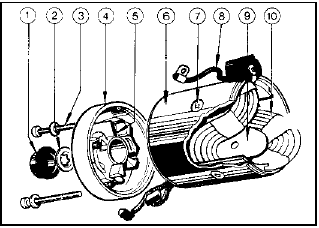
10.31 Lucas 8M90 starter motor brush assembly
1 Plastic cap
2 Star clip
3 Commutator end plate screw
4 Commutator end plate
5 Brush box
6 Yoke
7 Pole securing screw
8 Solenoid connector link
9 Pole shoe
10 Field coils
32 The commutator end plate is secured by two screws. The end plate and brush box are serviced as an assembly and should be renewed.
Lucas M79 type
33 With the starter motor removed from the
vehicle and cleaned, grip the unit in a vice
fitted with soft jaw protectors.
34 Unscrew the securing nut and washer and disconnect the wiring from the solenoid terminal.
35 Remove the two screws securing the commutator end housing cap. Remove the cap.
36 Remove the C-clip and spacers from the end of the armature shaft.
37 Remove the two commutator end housing securing screws and withdraw the end housing.
38 Separate the brush components (see illustration).
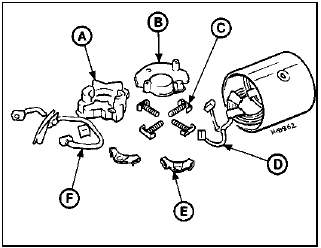
10.38 Lucas M79 starter motor brush plate components
A Brush plate
B Brush plate insulator
C Brush holders and springs
D Brushs
E Insulators
F Brush link
39 If the brushes have worn to less than the specified minimum, renew them as a set. To renew the brushes, cut the leads at their midpoint and make a good soldered joint when connecting the new brushes.
40 The commutator face should be clean and free from burnt spots. Where necessary burnish with fine glass paper (not emery) and wipe with a fuel-moistened cloth.
41 Locate the brush box over the commutator, position the brushes, then fit the nylon cover over the brushes. Route the brush wiring into the locating channel, then secure the brushes in the channels with the locking clips and springs.
42 Refit the commutator end housing, locating the rubber block in the cut-out in the housing, then secure with the two screws.
43 Refit the spacers and C-clip to the end of the armature shaft, then fit the commutator end housing cap and secure with the two screws.
44 Reconnect the wiring to the solenoid terminal and fit the washer and securing nut.
Nippondenso type
45 With the starter motor removed from the
vehicle and cleaned, grip the unit in a vice
fitted with soft jaw protectors.
46 Unscrew the retaining nut and washer and disconnect the wiring from the terminal on the solenoid.
47 Remove the two screws securing the commutator end housing cap and remove the cap (see illustration).
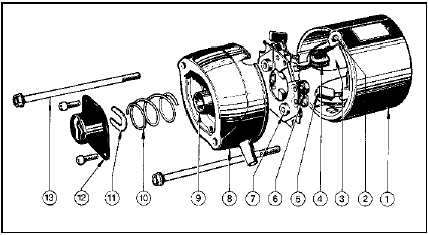
10.47 Nippondenso starter motor brush assembly
1 Yoke
2 Solenoid connecting link
3 Pole shoe
4 Rubber grommet
5 Brush
6 Brush spring
7 Brush plate
8 Commutator end housing
9 Bush
10 Spring
11 C-clip
12 Commutator end housing cap
13 Commutator end housing securing bolt
48 Remove the C-clip from the groove in the armature shaft, and remove the spring.
49 Unscrew the two bolts and washers, and withdraw the commutator end housing.
50 Withdraw the two field brushes from the brush plate, then remove the brush plate.
51 If the brushes have worn to less than the specified minimum, renew them as a set. To renew the brushes, cut the leads at their midpoint and make a good soldered joint when connecting the new brushes.
52 The commutator face should be clean and free from burnt spots. Where necessary burnish with fine glass paper (not emery) and wipe with a fuel-moistened cloth.
53 Position the brush plate over the end of the armature, aligning the cut-outs in the brush plate with the loops in the field windings. The brush plate will be positively located when the commutator end housing bolts are fitted.
54 Fit the brushes to their locations in the brush plate, and retain with the springs.
55 Fit the commutator end housing and secure with the two bolts and washers.
56 Fit the spring and the C-clip to the end of the armature shaft, then smear the end of the shaft with a little lithium-based grease, and refit the commutator end housing cap, securing with the two screws.
57 Reconnect the wiring to the solenoid terminal and fit the washer and retaining nut.
See also:
Automatic transmission brake band adjustment (Every 24 000 miles (40 000 km)
or 2 years)
Note: A brake band torque wrench - Ford tool
No 17-005, or a conventional torque wrench
and a splined socket of suitable size to fit the
square section head of the adjuster screw(s)
will be requir ...
Major operations requiring engine removal
The following work can only be carried out
after removal of the engine from the car:
a) Crankshaft main bearings - renewal .
b) Crankshaft - removal and refitting.
c) Flywheel - removal and refitt ...
Manual steering gear - removal and refitting
Note: A balljoint separator tool will be
required for this operation.
Removal
1 Set the front wheels in the straight-ahead
position. Ensure that the steering lock is
engaged and remove the igniti ...
