Interior pillar trim panels - removal and refitting
Front pillar
1 Remove the two trim panel securing screws
and withdraw the panel (see illustration)..
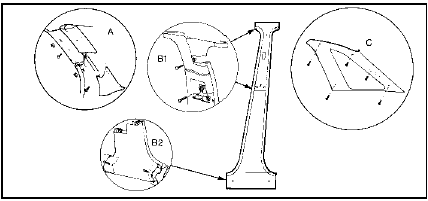
41.1 Interior pillar trim panel fixings - Hatchback models
A Front pillar trim panel B1 Centre pillar upper trim panel B2 Centre pillar lower trim panel C Rear pillar trim panel
2 Refitting is a reversal of removal.
Centre pillar
3 Where applicable, lever the seat belt height
adjuster button downwards and detach the
button by removing the two securing screws.
4 Unscrew the upper seat belt anchor nut, noting the fitted positions of any washers and spacers so that they can be refitted in their original positions.
5 Remove the two securing screws, and withdraw the upper trim panel.
6 Remove the two or three securing screws as applicable, and withdraw the lower trim panel, passing the seat belt webbing through the panel as it is removed.
7 Refitting is a reversal of removal.
Rear pillar
Saloon models
8 Remove the rear seat cushion.
9 Unbolt the lower seat belt anchor.
10 On models with fixed rear seats, remove the backrest.
11 On models with folding rear seats, remove the side cushion.
12 Remove the two securing screws from the base of the pillar trim panel, then pull the trim panel from the pillar, passing the seat belt webbing through the panel as it is removed.
13 Refitting is a reversal of removal.
Hatchback models
14 Remove the rear seat side cushion.
15 Remove the rear parcel shelf, and where applicable unbolt the rear seat belt upper anchor and spacer.
16 On “high specification” models, lift the seat catch release lever, push out the pin securing the link rod to the lever and disconnect the link rod.
17 Remove the securing screws from the rear parcel shelf support (nine screws on models up to 1987, eight screws from 1987 onwards) and on “high specification” models remove the two bolts securing the rear seat catch assembly to the wheel arch, then withdraw the catch assembly. Remove the rear parcel shelf support.
18 Remove the five securing screws and detach the rear pillar trim panel.
19 Refitting is a reversal of removal, but where applicable check the operation of the rear seat catch on completion.
P100 models
20 Remove the cover from the seat belt
upper anchor, then unscrew the anchor,
noting the fitted positions of any washers and
spacers so that they can be refitted in their
original positions.
21 Remove the three securing screws from the upper trim panel, and withdraw the panel (see illustration).
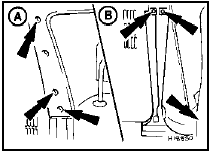
41.21 Interior rear pillar trim panel fixings (arrowed) - P100 models
A Upper trim panel B Lower trim panel
22 Remove the three securing screws from the lower trim panel, then pull the panel away from the pillar and pass the seat belt webbing through the slot.
23 Withdraw the trim panel by disengaging it from the seat belt inertia reel mounting bracket.
24 Refitting is a reversal of removal.
See also:
Braking system
General information and precautions
General information
The braking system is of the dual circuit
hydraulic type. The front and rear circuits are
operated independently from a tandem
master cylin ...
Master cylinder (conventional braking system) - removal, overhaul and
refitting
Note: Before commencing overhaul obtain a
repair kit containing new pistons and seals.
Caution: Refer to the
precautions in Section 1.
Removal
1 Depress the brake pedal several times to
dissipat ...
Coolant pump - removal and refitting
1 Disconnect the battery negative lead.
2 Drain the cooling system.
3 Proceed as follows according to model:
SOHC models
4 Disconnect the heater and radiator bottom
hoses from the coolant pump.
...
