Spark plugs and HT leads - removal, inspection and refitting
Note: The correct functioning of the spark plugs is vital for the correct running and efficiency of the engine. It is essential that the plugs fitted are appropriate for the engine, and the suitable type is specified at the beginning of this Chapter. If this type is used and the engine is in good condition, the spark plugs should not need attention between scheduled replacement intervals. Spark plug cleaning is rarely necessary and should not be attempted unless specialised equipment is available as damage can easily be caused to the firing ends.
Removal
1 Where necessary, for improved access
remove the air cleaner and/or the inlet hose.
2 If necessary, identify each HT lead for position, so that the leads can be refitted to their correct cylinders, then disconnect the leads from the plugs by pulling on the connectors, not the leads. Note that the position of No 1 cylinder HT lead in the distributor cap is marked with either a pip, or a number “1 “.
3 On 2.0 litre DOHC carburettor models, the location of the spark plugs and the close proximity of the carburettor makes spark plug access difficult, particularly when removing the plugs from cylinders 2 and 3. It is suggested that a 3/8 inch ratchet drive spark plug socket with rubber insert and long extension bar is used, possibly in conjunction with a universal joint adapter. It is also advisable to disconnect No 3 cylinder HT lead from the distributor first, to allow some slack for disconnection at the spark plug.
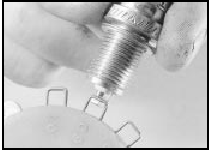
4 Clean the area around each spark plug using a small brush, then using a plug spanner (preferably with a rubber insert), unscrew and remove the plugs. Cover the spark plug holes with a clean rag to prevent the ingress of any foreign matter.
Inspection
5 The condition of the spark plugs will tell
much about the overall condition of the engine.
6 If the insulator nose of the spark plug is clean and white, with no deposits, this is indicative of a weak air/fuel mixture, or too hot a plug. (A hot plug transfers heat away from the electrode slowly - a cold plug transfers it away quickly).
7 If the tip and insulator nose is covered with hard black-looking deposits, then this is indicative that the mixture is too rich. Should the plug be black and oily, then it is likely that the engine is fairly worn, as well as the mixture being too rich.
8 If the insulator nose is covered with light tan to greyish brown deposits, then the mixture is correct and it is likely that the engine is in good condition.
9 The spark plug gap is of considerable importance, as, if it is too large or too small, the size of the spark and its efficiency will be seriously impaired. The spark plug gap should be set to the figure given in the Specifications at the beginning of this Chapter. To set it, measure the gap with a feeler blade, and then bend open, or close the outer plug electrode until the correct gap is achieved (see illustrations).
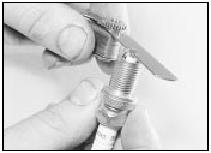
11.9a Measuring a spark plug gap using a feeler blade
11.9b Measuring a spark plug gap using a wire gauge
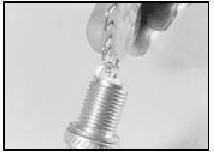
11.9c Adjusting a spark plug gap using a special tool
The centre electrode should never be bent as this may crack the insulation and cause plug failure, if nothing worse.
10 The distributor cap (except on 1.6 and 1.8 litre CVH (R6A type) engines) and the HT leads should be cleaned and checked at the specified intervals. To test the HT leads, remove them together with the distributor cap, then connect an ohmmeter to the end of each lead and its appropriate terminal within the cap in turn (see illustration).
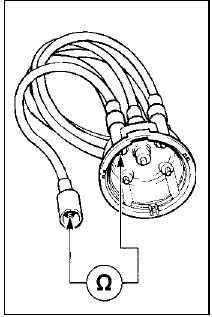
11.10 Method of testing an HT lead with an ohmmeter
If the resistance of any lead is greater than the maximum given in the Specifications, check that the lead connection in the cap is good before renewing the lead.
Refitting
11 Before fitting the spark plugs, check that
the threaded connector sleeves are tight and
that the plug exterior surfaces are clean. As
the plugs incorporate taper seats also make
sure that the threads and seats are clean.
12 On DOHC models before refitting the spark plugs, coat their threads with suitable antiseize compound, taking care not to contaminate the electrodes.
13 Screw in the spark plugs by hand, then tighten them to the specified torque. Do not exceed the torque figure.
14 Push the HT leads firmly onto the spark plugs, and where applicable refit the air cleaner and/or inlet hose.
See also:
Air Charge Temperature (ACT) sensor - removal and refitting
Removal
1 The air charge temperature sensor is
screwed into the inlet manifold (see
illustration).
14.1 Air charge temperature sensor - 1.6 EFI engine
A Wiring plug B Sensor
2 Disconnect the b ...
Manifolds, exhaust and emission control systems
All models utilise a light alloy inlet manifold which on
carburettor models is coolant heated to improve the atomisation of the fuel/air
mixture.
The exhaust manifold is of cast iron construction ...
Getting roadside assistance
To fully assist you should you have a vehicle concern, Ford Motor
Company offers a complimentary roadside assistance program. This
program is separate from the New Vehicle Limited Warranty. The serv ...
