Handbrake lever - removal and refitting
Removal
1 Chock the rear wheels, jack up the front of
the vehicle and support on axle stands.
Release the handbrake. Disconnect the battery negative lead.
2 Slacken the handbrake cable adjuster.
3 Extract the securing circlip and pivot pin, and detach the handbrake equaliser from the linkage on the underbody (see illustration).
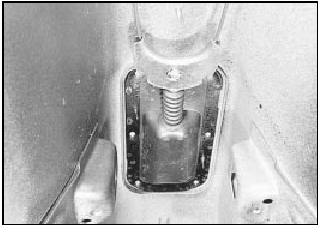
29.3 Handbrake equaliser and linkage on underbody
4 Working inside the vehicle, remove the handbrake lever rubber gaiter and/or the centre console, as necessary.
5 Disconnect the wiring connector from the handbrake “on” warning switch.
6 Unscrew the two handbrake lever mounting bolts, and carefully lift the lever through the underfloor gaiter.
7 If required, the handbrake “on” warning switch can be removed.
Refitting
8 Refitting is a reversal of removal, but on
completion, adjust the handbrake cable.
Brake pedal - removal and refitting
Removal
1 Remove the clutch pedal as described in
Chapter 6.
2 Extract the inboard circlip from the brake pedal end of the pivot shaft (see illustration).
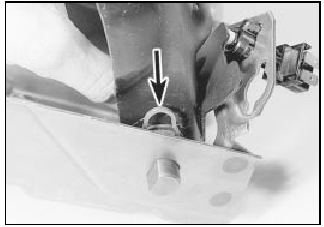
30.2 Extract the inboard circlip (arrowed) to remove the pedal pivot shaft
3 The brake pedal can now be removed from the pedal bracket by sliding out the pivot shaft, noting the position of any washers and spacers which may be fitted.
4 If desired, the nylon bushes can be prised from each side of the pedal for renewal, and the brake lamp switch removed.
Refitting
5 Refitting is a reversal of removal, fitting any
washers and spacers in their original
positions. Refit the clutch pedal.
See also:
Diagram 2: 1980-86 Lighting all models
Diagram 2: 1980-86 Lighting all models ...
Brake drum - inspection and renewal
Note: Before starting work, refer to the note at
the beginning of Section 2 concerning the
dangers of asbestos dust.
1 Whenever a brake drum is removed, brush
out dust from it, taking care not to ...
Fuses and relays
Fuses
If electrical components in the
vehicle are not working, a fuse may
have blown. Blown fuses are
identified by a broken wire within
the fuse. Check the appropriate
fuses before replacing an ...
