Rear suspension and axle assembly (P100 models) - removal and refitting
Note: All self-locking nuts and spring washers must be renewed on reassembly.
Removal
1 Chock the front wheels, jack up the rear of
the vehicle and support on axle stands placed
under the side members. Note that a loaded
vehicle must not be jacked under the
differential casing.
2 Support the rear axle with a jack, using an interposed block of wood to spread the load.
3 Remove the propeller shaft.
4 Remove the securing circlip and the pivot pin, and detach the handbrake equaliser from the linkage on the underbody.
5 Remove the handbrake cables from the clips on the underbody, and from the brackets on the crossmember. To remove the cables from the crossmember, remove the U-shaped retaining clips. Note that the cable adjuster is secured to the right-hand crossmember bracket. Ensure that the handbrake is released before attempting to disconnect any part of the mechanism.
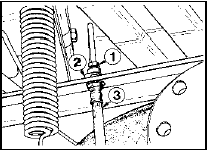
6 Unscrew the brake pipe from the brake hose on the right-hand side of the chassis crossmember. Plug the ends of the pipe and hose to prevent leakage and dirt ingress, then detach the hose from the crossmember by removing the U-shaped retaining clip (see illustration).

18.6 Brake pipe-to-hose connection on right-hand side of chassis crossmember
- P100 models
1 Brake pipe
2 U-shaped clip
3 Brake hose
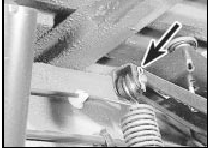
7 Remove the spring clip and clevis pin and disconnect the spring from the brake load apportioning valve lever on the right-hand side of the underbody (see illustration).

18.7 Remove the split pin (arrowed) from the brake load apportioning valve
lever
8 Detach the exhaust system from the two rear mountings.
9 Unbolt the shock absorbers from the chassis crossmember.
10 Unbolt the leaf springs from the front brackets on the underbody, (Section 19).
11 Lower the rear axle.
12 Loosen the spring shackle-to-underbody bolts, then unbolt the leaf springs from the spring shackles, and remove the rear suspension and axle assembly from under the vehicle, guiding the handbrake cables over the exhaust system.
Refitting
13 Refitting is a reversal of removal, bearing
in mind the following points.
14 Do not fully tighten the leaf spring mounting bolts or the spring shackle-to-underbody bolts until the weight of the vehicle is resting on the roadwheels.
15 Renew all self-locking nuts and spring washers.
16 On completion, check the brake load apportioning valve adjustment and the handbrake adjustment. Bleed the rear brake circuit and check the axle oil level.
See also:
Electronic Fuel Injection (EFI) system
From the 1990 model year, an Electronic Fuel Injection (EFI)
system controlled by the Electronic Engine Control IV (EEC IV) system, and
incorporating an Electronic Distributorless Ignition system ...
Inlet manifold - removal and refitting
Note: A new gasket will be required on
refitting.
Carburettor models
Removal
1 Disconnect the battery negative lead.
2 Remove the air cleaner as described in Part
A of this Chapter.
3 Refer to ...
Rear shock absorbers (Van models) - removal, testing and
refitting
Removal
1 Raise and support the rear of the vehicle on
stands (see “Jacking and Vehicle Support”).
Place a jack beneath the rear axle tube and
just raise it slightly.
2 Disconnect the shock absor ...
