Pistons and connecting rods - examination and renovation
1.8 litre (R2A type)
1 Examine the pistons for ovality, scoring,
and scratches. Check the connecting rods for
wear or damage.
2 The gudgeon pins are an interference fit in the connecting rods, and if new pistons are to be fitted to the existing connecting rods the work should be carried out by a Ford dealer who will have the necessary tooling. Note that the oil hole in the connecting rod must be located on the right-hand side of the piston (the cut-out in the piston crown and the lug on the piston skirt face forwards).
3 If new rings are to be fitted to the existing pistons, expand the old rings over the top of the pistons (see illustration).
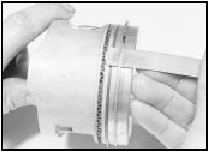
31.3 Using an old feeler gauge to aid the fitting of a piston ring - 1.8
litre (R2A)
Note that the oil
control ring is in three sections.
4 Before fitting the piston rings, clean out the piston ring grooves using a piece of old piston ring as a scraper. Be careful not to scratch the aluminium surface of the pistons. Protect your fingers - piston ring edges are sharp. Also probe the groove oil return holes.
5 Fit the oil control ring sections with the spreader ends abutted opposite the front of the piston. The side ring gaps should be 25 mm (1.0 in) either side of the spreader gap. Fit the tapered lower compression ring with the “TOP” mark towards the top of the piston and the gap 150º from the spreader gap, then fit the upper compression ring with the gap 150º on the other side of the spreader gap. Note that the compression rings are coated with a molybdenum skin which must not be damaged.
1.6 and 1.8 litre (R6A type) 6 Proceed as described in paragraphs 1 to 5 inclusive, but note the following differences for the 1.6 litre engine.
7 Before fitting the new rings to the pistons, insert them into the relevant cylinder bore and use a feeler blade to check that the end gaps are within the limits given in the Specifications at the beginning of this Chapter. Check the end gaps with the ring at the top and the bottom of the cylinder bore.
8 Fit the oil control ring sections with the spreader ends abutted opposite the front of the piston, making sure that the ends do not overlap. The side ring gaps should be offset 120º either side of the spreader gap. Fit the tapered lower compression ring with the “TOP” mark uppermost and the gap 120º from the spreader gap, then fit the upper compression ring with the gap 120º on the other side of the spreader gap. Note that the compression rings are coated with a molybdenum disulphide skin, which must not be damaged.
See also:
Distributor cap and rotor arm (OHC models) - removal and refitting
SOHC models
1 Disconnect the battery negative lead.
2 Where applicable, unclip the screening can
from the top of the distributor and disconnect
the earth strap (see illustration).
13.2 Unclippi ...
Rear roadspring (Van models) - removal and refitting
Removal
1 To remove the single leaf type rear
roadspring from the Van, raise the rear of the
vehicle and support it securely under the body
members (see “Jacking and Vehicle Support”).
Support th ...
Front seat air cushion assembly - removal and refitting
Complete assembly - removal and
refitting
1 Remove the seat.
2 Straighten the seat back cover retaining
tangs, and pull the cover upwards to expose
the air cushion.
3 Cut through the four securi ...
