Interior lamp bulbs - renewal
1 Disconnect the battery negative lead.
Courtesy lamp
2 Remove the courtesy lamp.
3 Unclip the bulb from the lamp. On models fitted with an overhead console and map reading lamps, the courtesy lamp reflector must be unclipped for access to the bulb (see illustration).
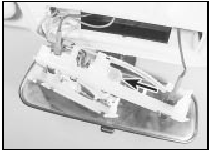
27.3 Overhead console-mounted courtesy lamp bulb (arrowed)
4 Refitting is a reversal of removal.
Map reading lamp
5 Remove the map reading lamp.
6 Pull the bulbholder from the rear of the lamp. The bulb is a push fit in the bulbholder (see illustration).
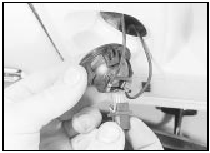
27.6 Removing a map reading lamp bulb
7 Refitting is a reversal of removal.
Glove compartment lamp
8 Open the glove compartment and pull the
bulb from its holder.
9 Refitting is a reversal of removal.
Ashtray lamp
10 Open the ashtray and remove the tray
from its housing.
11 Pull the bulbholder from the housing. The bulb is a push fit in the bulbholder.
12 Refitting is a reversal of removal.
Heater blower switch illumination
lamp
13 Carefully pull off the switch knob, using
pliers with padded jaws if necessary. The bulb
is a bayonet fit in the end of the switch shaft.
14 Refitting is a reversal of removal.
Heater control illumination lamp 15 Refer to Chapter 12.
Vanity mirror illumination lamp 16 Lower the sun visor and, using a thinbladed screwdriver, prise out the mirror and diffuser assembly. Remove the festoon bulb(s) from its/their spring contacts.
17 Refitting is a reversal of removal.
Hazard flasher switch lamp 18 Remove the securing screws and unclip the upper steering column shroud.
19 Ensure that the switch is in the “on” position, then pull off the switch cap/bulb cover. Carefully pull the bulb from the switch using a pair of pliers with padded jaws.
20 Refitting is a reversal of removal.
Automatic transmission gear selector illumination lamp 21 Unscrew the selector lever handle from the threaded end of the lever, then remove the three securing screws and withdraw the centre console front upper panel.
22 Pull of the selector gate cover to expose the bulbholder. The bulb is a bayonet fit in the bulbholder.
23 Refitting is a reversal of removal.
Luggage compartment lamp 24 Remove the lamp by carefully prising it from its location using a thin-bladed screwdriver. Unclip and remove the bulb (see illustration).
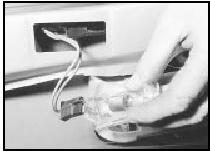
27.24 Removing a luggage compartment lamp bulb
25 Refitting is a reversal of removal.
Clock illumination lamp
26 Remove the clock.
27 The bulb is a bayonet fit in the rear of the clock.
28 Refitting is a reversal of removal.
See also:
Specifications
Front suspension
Type . . . . . . . . . . . . . . . . . . . . . . . . . . . . . . . . . . . . . .
. . . . . . . . . . . . . . Independent by MacPherson struts with coil springs
and
integral tele ...
Front tie-bar - removal and refitting
Pre-May 1983 1.1 litre models
Removal
1 Jack up the front of the car and support it
on stands (see “Jacking and Vehicle Support”).
2 Unscrew and remove the nut which holds
the tie-bar to the larg ...
General information and precautions
Contact breaker ignition system
The ignition system is divided into two
circuits, low tension (primary) and high tension
(secondary). The low tension circuit consists of
the battery, ignition swit ...
