Underbonnet lamp - removal, refitting and bulb renewal
1 Disconnect the battery negative lead.
Removal and refitting
2 Detach the wiring connector at the left-hand
bonnet hinge, and attach a length of string to
the end of the wire running from the lamp.
3 If necessary, remove the underbonnet insulation by prising out the two-piece plastic securing clips, then working at the lamp, pull the wiring and the string through the bonnet panel.
4 Detach the string from the end of the wire, and remove the screw securing the lamp to the bonnet. Withdraw the lamp.
5 Commence refitting by attaching the end of the wiring to the string, and pulling the string and wiring through the bonnet panel. Further refitting is a reversal of removal.
Bulb renewal
6 Simply press and twist the bulb to remove it
from the bulbholder (see illustration).
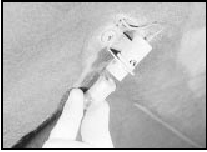
28.6 Removing an underbonnet lamp bulb
7 Refitting is a reversal of removal.
Horn - removal and refitting
Removal
1 The horn(s) is/are located in front of the
radiator beneath the front panel (see
illustration). The horn(s) may be located on
either side of the vehicle depending on model.
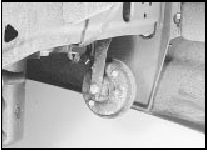
29.1 Horn location beneath front panel
2 Disconnect the battery negative lead.
3 Disconnect the wiring from the horn, then unscrew the securing nut and washer and withdraw the horn and bracket assembly complete.
4 Repeat the operations for the remaining horn where applicable.
Refitting
5 Refitting is a reversal of removal.
See also:
Rear disc splash shield - removal and refitting
Note: A suitable puller will be required to
remove the drive flange, and a new rear hub
nut must be used on reassembly.
Caution: Refer to the
precautions in Section 1.
Removal
1 Loosen the rear ...
Temperature gauge sender unit - removal and refitting
Note: Suitable jointing compound will be
required on refitting.
Removal
1 With the engine cold unscrew the pressure
cap on the thermostat housing or expansion
tank as applicable, then refit it. T ...
Crankshaft front oil seal - renewal
1 Disconnect the battery negative lead.
2 Slacken the alternator mounting and
adjuster bolts and after pushing the alternator
in towards the engine, slip off the drivebelt.
3 Unscrew and remove th ...
