Weber 2V carburettor - adjustment
Idle speed and mixture
adjustment
1 Refer to Chapter 1.
Fast idle speed (XR3 models) 2 Remove the air cleaner as described in Section 2.
3 Have the engine at normal operating temperature, with a tachometer connected in accordance with the manufacturer’s instructions.
4 With the engine switched off, partially open the throttle by moving the cable at the carburettor. Close the choke plates with the fingers and hold them closed while the throttle is released. This has the effect of setting the choke mechanism in the high cam/fast idle position (see illustration).
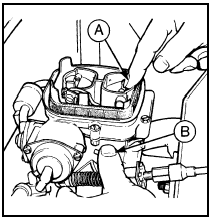
13.4 Weber 2V carburettor choke linkage position for fast idle adjustment -
XR3 models
A Choke plates held closed B Throttle held partially open
5 Release the choke valve plates and without touching the accelerator pedal, start the engine by just turning the key. Record the engine speed shown on the tachometer and compare the figure with that specified.
6 Where necessary turn the fast idle screw in or out to adjust the fast idle speed (see illustration).
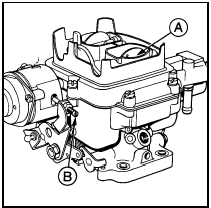
13.6 Weber 2V carburettor fast idle adjustment - XR3 models
A Choke plates in open position B Fast idle adjustment screw
7 Refit the air cleaner.
Fast idle speed (1.4 litre models) 8 Adjust the engine idle speed and mixture settings as previously described, then switch off the engine. Leave the tachometer connected from the previous operation.
9 Undo the four bolts securing the air cleaner to the carburettor, disconnect the hot and cold air inlet hoses and lift off the air cleaner.
Position the air cleaner clear of the carburettor, but leave the crankcase breather hoses and the vacuum supply hose connected.
10 Pull the choke knob fully out and start the engine.
11 Using a finger on the linkage lever as shown, hold the choke plate open and note the fast idle speed (see illustration).
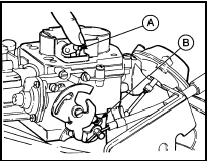
13.11 Weber 2V carburettor fast idle adjustment - 1.4 litre models
A Choke plates held open B Fast idle adjustment screw
12 If adjustment is necessary turn the fast idle adjusting screw until the specified speed is obtained.
13 On completion refit the air cleaner and disconnect the tachometer.
Fast idle speed (1.6 litre models -
1986 onwards)
14 Remove the air cleaner as described in
Section 2.
15 Have the engine at normal operating temperature with a tachometer connected in accordance with the manufacturer’s instructions.
16 With the engine stopped, open the throttle linkage slightly by hand and close the choke plate until the fast idle adjusting screw lines up with the third (middle) step of the fast idle cam (see illustration). Release the throttle so that the fast idle screw rests on the cam.
Release the choke plate.
13.11 Weber 2V carburettor fast idle adjustment - 1.4 litre models
A Choke plates held open B Fast idle adjustment screw
17 Without touching the accelerator pedal, start the engine by just turning the key.
18 Note the fast idle speed and if adjustment is necessary, turn the fast idle adjusting screw until the specified speed is obtained.
19 On completion refit the air cleaner and disconnect the tachometer.
Fast idle speed (1.1 and 1.3 litre
HCS engine models)
20 Adjust the engine idle speed and mixture
settings as previously described, then switch
off the engine. Leave the tachometer
connected from the previous operation.
21 Remove the air cleaner assembly as described in Section 2.
22 Hold the choke valve fully open, start the engine and check the engine speed.
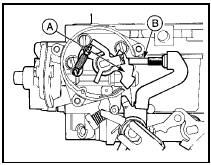
23 Adjust as necessary on the fast idle speed screw (see illustration).
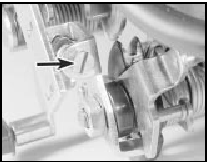
13.23 Weber 2V carburettor fast idle adjustment screw (arrowed) - 1.1 and 1.3
litre HCS engine models
24 Turning the screw anti-clockwise increases the fast idle speed, turning it clockwise decreases the speed.
25 On completion, stop the engine, remove the test equipment and refit the air cleaner.
Throttle kicker (1.4 litre models) 26 Remove the air cleaner as described in Section 2. Plug the vacuum supply from the manifold.
27 Have the engine at normal operating temperature with a tachometer connected in accordance with the manufacturer’s instructions.
28 With the engine running and the idle speed and mixture correctly adjusted, manually operate the throttle kicker by lifting the operating lever upwards. Note the increase in engine speed.
29 If the increased speed is outside the figure given in the Specifications, remove the tamperproof plug from the top of the kicker body and adjust the unit to give the specified speed.
30 Remove the tachometer and refit the air cleaner on completion.
Throttle kicker (1.6 litre models -
1986 onwards)
31 The throttle kicker is only fitted to models
with automatic transmission.
32 Have the engine at normal operating temperature, with the idle speed and mixture correctly adjusted and with a tachometer connected.
33 Disconnect the wiring multi-plug from the radiator cooling fan thermostatic switch in the thermostat housing, and bridge the two contacts in the plug using a suitable length of wire. This is necessary so that the cooling fan runs continuously during adjustment.
34 Disconnect the vacuum supply at the throttle kicker and also disconnect the vacuum supply to the throttle kicker electrically-operated vacuum switch, at the manifold take-off. Using a new hose connect the kicker directly to the manifold.
35 Start the engine and record the rpm.
36 If the engine speed is outside the figure given in the Specifications, remove the tamperproof plug from the top of the kicker body and adjust the unit to give the specified speed.
37 On completion refit the vacuum connections in their original positions, reconnect the fan motor multi-plug and refit the air cleaner.
See also:
Fuel vapour separator (models from 1985) - removal and refitting
Caution: Refer to the
precautions in Section 1 before
proceeding.
Removal
1 On SOHC models, the vapour separator is
located on the left-hand side of the engine
compartment. On CVH models, the va ...
Cigar lighter - removal and refitting
Removal
1 Disconnect the battery negative terminal.
2 On pre-1986 models remove the ashtray
then undo the screws and withdraw the
ashtray housing. On 1986 models onwards,
refer to Section 21 and ...
Pistons and connecting rods - removal and refitting
Note: New connecting rod bolts and a new oil
pick-up pipe gasket must be used on refitting.
Removal
1 Remove the sump and the cylinder head.
2 Unscrew the two securing bolts, and
remove the oil p ...
