Radio/cassette player - removal and refitting
Standard fixing
1 Disconnect the battery negative lead.
2 Pull off the two control knob assemblies.
3 Release the trim panel by unscrewing the two securing nuts from the control spindles.
Remove the trim panel.
4 Using a hooked instrument, pull the mounting plate securing tangs towards the centre of the radio/cassette player, then slide the unit forwards from the facia panel (see illustration).
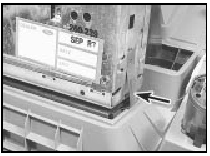
57.4 Radio/cassette player securing tangs (arrowed) viewed from the rear of
the unit - standard fixing
5 Disconnect the wiring plugs and the aerial lead, then remove the unit.
6 Remove the plastic support bracket from the rear of the unit, and unscrew the nuts and washers from the control spindles to remove the mounting plate from the front of the unit.
7 Refitting is a reversal of removal.
DIN fixing
8 An increasing number of radio/cassette
players have DIN standard fixings. Two
special tools, obtainable from in-car
entertainment specialists, are required for
removal.
9 Disconnect the battery negative lead.
10 Insert the tools into the holes in the front of the radio/cassette player and push them until they snap into place. Pull the tools outwards to release the unit (see illustration).
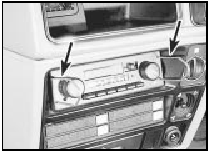
57.10 Removing a radio/cassette player using special tools - DIN fixing
11 Pull the unit forwards and disconnect the wiring plugs and the aerial lead. Remove the unit from the facia panel.
12 To refit the radio/cassette player, reconnect the wiring and the aerial lead, then simply push the unit into its bracket until the retaining lugs snap into place.
Wiring diagrams - general information
Each wiring diagram covers a particular system of the appropriate vehicle; as indicated in each caption. Carefully read the Key to each diagram before commencing work.
See also:
Ignition system - testing
Note: Refer to the precautions given in
Section 1 before proceeding.
Contact breaker ignition system
1 By far the majority of breakdown and
running troubles are caused by faults in the
ignition s ...
Sump - removal and refitting
Warning: A new sump gasket will
be required on refitting, and
suitable sealing compound will
be required to coat the sump and
cylinder block mating faces.
Shims may be required when mating the
e ...
Battery
Your vehicle is equipped with a
Motorcraft maintenance-free battery
which normally does not require
additional water during its life of
service.
However, for severe usage or in high temperature ...
