Fuel filter renewal - fuel injection engines (Every 24 000 miles or 2 Years)
Warning: This procedure may result in some fuel spillage. Before carrying out any operation on the fuel system refer to the precautions given in Safety First! at the beginning of this manual and follow them implicitly. Petrol is a highly dangerous and volatile liquid and the precautions necessary when handling it cannot be overstressed.
Bosch K-Jetronic and KE-Jetronic
fuel injection models
1 Disconnect the battery negative lead.
2 Relieve the system pressure (Chapter 4, Part B).
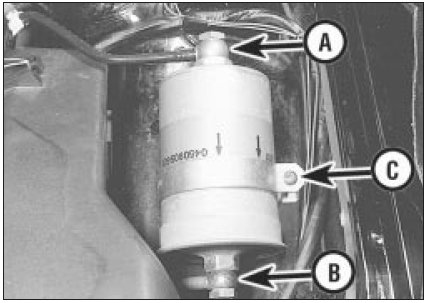
3 Place absorbent rags beneath the filter and disconnect the fuel inlet and outlet connections (see illustration).

36.3 Fuel filter inlet pipe (A), outlet pipe (B) and clamp screw (C)
4 Slacken the clamp bracket screw and withdraw the filter from the bracket.
5 Refitting is the reversal of removal, but ensure that the arrows on the filter body point in the direction of fuel flow; ie towards the outlet pipe union. On completion check for fuel leaks with the engine running.
Central Fuel Injection (CFI)
models
6 Disconnect the battery negative lead.
7 Position a suitable container beneath the fuel filter to catch any escaping fuel, then slowly slacken the fuel inlet pipe union, allowing the pressure in the fuel line to dissipate. When fully dissipated, disconnect the fuel inlet and outlet pipe unions. Take adequate fire precautions.
8 Note the orientation of the flow direction markings on the filter casing, then remove the clamp bolt and withdraw the filter from the vehicle. Note that the filter will still contain fuel, and care should be taken to avoid spillage.
9 Refitting is a reversal of the removal procedure, but ensure that the flow direction markings on the filter casing are correctly orientated, and tighten the unions to the specified torque.
10 On completion, switch the ignition on and off at least five times, and check for fuel leakage.
Electronic Fuel Injection (EFI)
models
11 The filter is located in the engine
compartment.
12 Depressurise the fuel system as described in Chapter 4, Part D, then disconnect the inlet and outlet unions from the filter.
13 Note the orientation of the flow direction markings on the filter casing, then remove the clamp bolt and withdraw the filter from the vehicle. Note that the filter will still contain fuel, and care should be taken to avoid spillage.
14 Refitting is a reversal of the removal procedure, but ensure that the flow direction markings on the filter casing are correctly orientated, and tighten the unions to the specified torque.
15 On completion, switch the ignition on and off at least five times, and check for fuel leakage.
See also:
Automatic transmission fluid level check (Every 12 000 miles (20 000 km) or
12 months)
1 Fluid level should be checked with the
transmission at operating temperature (after a
run) and with the vehicle parked on level
ground.
2 Open and prop the bonnet. With the engine
idling and th ...
Engine - removal leaving manual gearbox in vehicle
Note: A suitable hoist and lifting tackle will be
required for this operation.
1.8 litre (R2A type)
1 Disconnect the battery negative lead.
2 Remove the bonnet.
3 Remove the air cleaner.
4 Disco ...
Interior trim panels - removal and refitting
Rear quarter trim panel
Removal
1 Unbolt the seat belt from its floor mounting.
2 Pass the belt buckle slide through the panel
aperture.
3 Pull the seat cushion and backrest forward.
4 Extract t ...
