Valve block (ABS) - removal and refitting
Caution: Refer to the precautions in Section 1.
Removal
1 Disconnect the battery negative lead.
2 Depressurise the hydraulic system by pumping the brake pedal at least 20 times, or until it becomes hard.
3 Apply the handbrake, and slacken the left-hand front wheel nuts. Jack up the front of the vehicle and support on axle stands (see “Jacking and Vehicle Support”).Remove the left-hand front wheel.
4 Remove the plastic liner from under the wheel arch.
5 Prepare a suitable container to catch spilt fluid, clean around the unions on the valve block, then unscrew and disconnect the fluid pipes (see illustration). Plug the open ends of the pipes and valve block to prevent fluid leakage and dirt ingress. If fluid is accidentally spilt on the paintwork, wash off immediately with cold water.
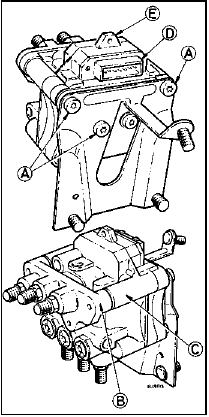
20.5 Valve block and associated components - ABS
A Bracket screws
B Adapter plate
C valve block
D Multi-plug
E Earth strap anchor point
6 Disconnect the multi-plug and the earth strap from the valve block.
7 Working through the wheel arch, unscrew the three nuts which secure the valve block mounting bracket (see illustration).
20.7 Unscrewing the valve block mounting bracket nuts (arrowed) - ABS
8 Remove the valve block and mounting bracket, taking care not to spill brake fluid on the paintwork.
9 No further dismantling of the valve block is possible, but the pressure regulating valve in the rear brake pipe union can be renewed if desired.
Refitting
10 Refitting is a reversal of removal.
11 On completion, bleed the complete hydraulic system and check for leaks around all disturbed components.
Computer module (ABS) - removal and refitting
Removal
1 Disconnect the battery.
2 Working inside the vehicle, prise out the facia trim panel from the passenger’s side.
Remove the insulation.
3 To remove the now exposed module, push it as necessary to release the retaining catch.
4 Withdraw the module, and disconnect the multi-plug (see illustration).
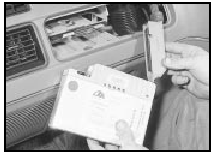
21.4 Withdraw the module and disconnect the multi-plug - ABS
Refitting
5 Refitting is a reversal of removal but on
completion check the operation of the ABS
warning lamp as described in the
manufacturer’s handbook.
See also:
Routine maintenance and servicing
Ford Sierra maintenance schedule
The maintenance intervals in this manual
are provided with the assumption that you will
be carrying out the work yourself. These are
the minimum maintenance interv ...
Fuel system - depressurising
Warning: The fuel system will
remain pressurised after the
engine is switched off. Comply
with relevant safety precautions
during this operation and refer to the
“Safety First” Section at the beg ...
Power-operated folding roof components - removal and refitting
Hydraulic rams
Removal
1 Remove the rear wheelhouse covers with
reference to Section 32.
2 Mark the two hoses connected to the ram
as a guide to reassembly, then remove the
circlips securing the ...
