Piston/connecting rod assemblies - removal and refitting
Note: A piston ring compressor tool will be required for this operation.
Removal
1 Remove the cylinder head and the sump as
described in Sections 4 and 5 respectively. Do
not remove the oil pick-up filter or pipe, which
is an interference fit.
2 Note the location numbers stamped on the connecting rod big-ends and caps, and to which side they face. No 1 assembly is nearest the timing cover and the assembly numbers are towards the camshaft side of the engine (see illustration).
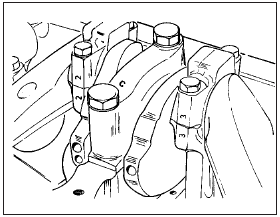
8.2 Connecting rod and big-end cap identification numbers
3 Turn the crankshaft by means of the pulley bolt until the big-end cap bolts for No 1 connecting rod are in their most accessible position. Unscrew and remove the bolts and the big-end cap complete with bearing shell. If the cap is difficult to remove, tap it off with a plastic-faced hammer.
4 If the bearing shells are to be used again (Section 13), keep the shell taped to its cap.
5 Feel the top of the cylinder bore for a wear ridge. If one is detected, it should be scraped off before the piston/rod is pushed out of the top of the cylinder block. Take care when doing this not to score the cylinder bore surfaces.
6 Push the piston/connecting rod out of the block, retaining the bearing shell with the rod if it is to be used again.
7 Dismantling the piston/rod is covered in Section 13.
8 Repeat the operations on the remaining piston/rod assemblies.
Refitting
9 To install a piston/rod assembly, have the
piston ring gaps staggered as shown, oil the
rings and apply a piston ring compressor (see
illustration). Compress the piston rings.
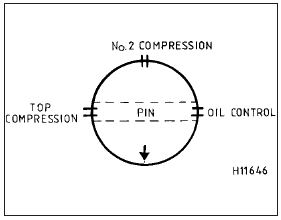
8.9 Piston ring end gap positioning diagram
10 Oil the cylinder bores.
11 Wipe out the bearing shell seat in the connecting rod and insert the shell.
12 Lower the piston/rod assembly into the cylinder bore until the base of the piston ring compressor stands squarely on the top of the block (see illustration).

8.12 Fitting a piston/connecting rod assembly with ring compressor in
position
13 Check that the directional arrow on the piston crown faces towards the timing cover end of the engine and then apply the wooden handle of a hammer to the piston crown (see illustrations). Strike the head of the hammer sharply to drive the piston into the cylinder bore.
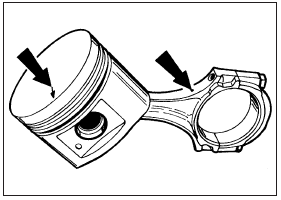
8.13a Relative positions of piston directional arrow and oil squirt hole in
connecting rod

8.13b Arrow on piston crown must face the timing cover when installed
14 Oil the crankpin and draw the connecting rod down to engage with the crankshaft.
Check that the bearing shell is still in position in the connecting rod.
15 Wipe the bearing shell seat in the big-end cap clean and insert the bearing shell.
16 Fit the cap, screw in the bolts and tighten to the specified torque.
17 Repeat the operations on the remaining pistons/connecting rods.
18 Refit the sump (Section 5) and the cylinder head (Section 4). Refill with oil and coolant.
See also:
Cylinder head - dismantling and reassembly
Note: A valve spring compressor will be
required during this procedure. New valve
stem oil seals should be used on reassembly.
Dismantling
1 With the cylinder head removed, remove
the camshaft.
...
Pistons and connecting rods - removal and refitting
Note: New connecting rod bolts and a new oil
pick-up pipe gasket must be used on refitting.
Removal
1 Remove the sump and the cylinder head.
2 Unscrew the two securing bolts, and
remove the oil p ...
Steering gear - removal, overhaul and refitting
Removal
Note: New tie-rod balljoint split-pins must be
used on refitting.
1 Set the front roadwheels in the straightahead
position.
2 Raise the front of the vehicle and fit stands
(see “Jacking ...
