Oil seals - renewal
Camshaft oil seal Note: Thread locking compound will be required to coat the camshaft sprocket bolt on refitting.
1 Disconnect the battery negative lead.
2 Release the timing belt from the camshaft sprocket, as described in Section 4.
3 Pass a bar through one of the holes in the camshaft sprocket to anchor the sprocket while the retaining bolt is unscrewed. Remove the sprocket.
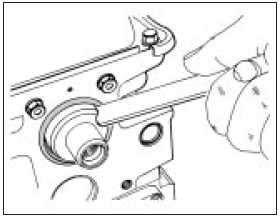
4 Using a suitable tool, hooked at its end, prise out the oil seal (see illustration).

5.4 Removing the camshaft oil seal
5 Apply a little grease to the lips of the new seal and draw it into position using the sprocket bolt and a suitable distance piece.
6 Refit the sprocket, tightening the bolt to the specified torque wrench setting. Thread locking compound should be applied to the threads of the bolt.
7 Refit and tension the timing belt (Section 4).
8 Reconnect the battery.
Crankshaft front oil seal 9 Disconnect the battery negative lead.
10 Release the alternator mounting and adjuster link bolts, push the alternator in towards the engine and slip the drivebelt from the pulleys.
11 Unbolt and remove the timing belt cover.
On models with a two-piece cover only the upper half can be removed at this stage.
12 Locate a spanner onto the crankshaft pulley bolt and turn the crankshaft over in its normal direction of travel until the timing marks of the crankshaft sprocket and cylinder head are in alignment.
13 You will now need to remove the crankshaft pulley. To prevent the crankshaft turning, place the vehicle in gear and have an assistant apply the brakes or unbolt and remove the starter motor so that the flywheel ring gear can be jammed with a cold chisel or suitable implement. Unbolt the crankshaft pulley and remove it with its thrustwasher.
Where a two-piece timing belt cover is fitted, remove the lower half.
14 Slacken the belt tensioner bolts, lever the tensioner to one side and retighten the bolts.
With the belt slack, it can now be slipped from the sprockets. Before removing the belt note its original position on the sprockets (mark the teeth with quick-drying paint), also its direction of travel.
15 Withdraw the crankshaft sprocket. If it is tight you will need to use a special extractor, but due to the confined space available you may need to lower the engine from its mounting on that side. Before resorting to this, try levering the sprocket free using screwdrivers. If the mounting is to be disconnected refer to Part A of this Chapter.
16 Remove the dished washer from the crankshaft, noting that the concave side is against the oil seal.
17 Using a suitably hooked tool, prise out the oil seal from the oil pump housing.
18 Grease the lips of the new seal and press it into position using the pulley bolt and suitable distance piece made from a piece of tubing.
19 Fit the thrustwasher (concave side to oil seal), the belt sprocket and the pulley to the crankshaft. On models with a two-piece timing belt cover, place the lower half in position before refitting the pulley.
20 Fit and tension the timing belt by the method described in Section 4.
21 Fit the timing belt cover.
22 Refit and tension the alternator drivebelt (Chapter 1).
23 Remove the starter ring gear jamming device (if fitted), refit the starter motor and reconnect the battery.
See also:
Engine/automatic transmission assembly - removal and separation
Note: A suitable hoist and lifting tackle will be
required for this operation. Any suspected
faults in the automatic transmission should be
referred to a Ford dealer or automatic
transmission spec ...
Electric window components - removal and refitting
1 Disconnect the battery negative lead.
Switches
2 Prise the switch from its location using a
thin-bladed screwdriver, and disconnect the
wiring plug (see illustration).
49.2 Disconnecting the ...
Rear brake shoe lining check (Every 6000 miles or 6 months)
1 Due to the fact that the rear brake drums
are combined with the hubs, which makes
removal of the drums more complicated than
is the case with detachable drums, inspection
of the shoe linings can ...
