Radiator fan - removal and refitting
All models except RS Turbo
Removal
1 Disconnect the battery negative terminal.
2 Disconnect the wiring plug at the fan motor and unclip the wiring from the shroud.
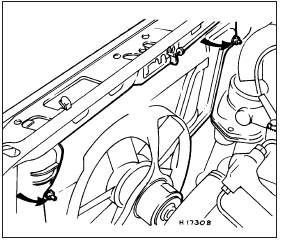
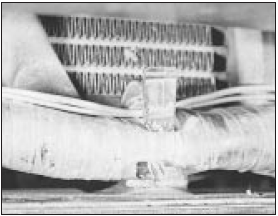
3 On pre-1986 models the fan shroud is secured to the radiator with four bolts.
Unscrew the two upper bolts and slacken the two lower bolts (see illustration).

2.3 Radiator fan shroud retaining bolts - pre-1986 models
4 For 1986 models onwards the shroud is retained by two bolts at the top and two clips at the bottom. Unscrew the two upper bolts (see illustration).
2.4 Radiator fan shroud retaining bolts - 1986 models onwards
5 On all models carefully lift the fan and shroud assembly upwards and out of the engine compartment, taking care not to damage the radiator.
6 Extract the retaining clip and remove the fan from the motor shaft.
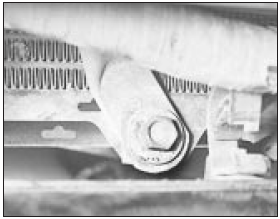
7 Unscrew the three nuts and separate the motor from the shroud (see illustration).
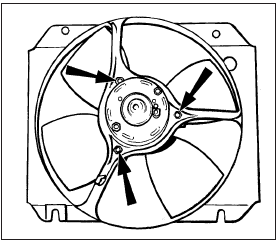
2.7 Fan motor retaining nuts - pre-1986 models
Refitting 8 Reassembly and refitting are reversals of the removal and dismantling operations.
RS Turbo models
1985 models
Removal
9 Disconnect the battery negative terminal.
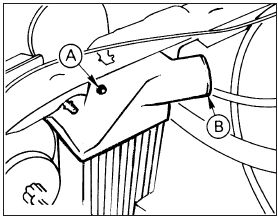
10 Detach the transverse coolant hose from the two clips above the radiator (see illustration).
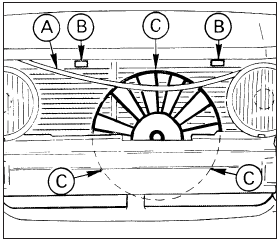
2.10 Radiator fan removal details - 1985 RS Turbo
A Transverse cooling hose B Transverse cooling hose clips C Fan shroud retaining bolts
11 Unscrew the three fan shroud retaining bolts.
12 Disconnect the upper and lower air hoses at the turbo intercooler mounted alongside the radiator.
13 Undo the two air cleaner retaining bolts and remove the air cleaner assembly (see illustration).
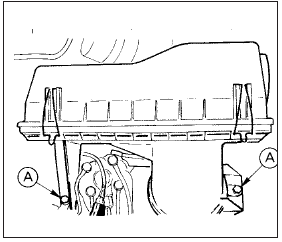
2.13 Air cleaner retaining bolts (A) - 1985 RS Turbo
14 Undo the single upper retaining screw and lift the intercooler to disengage the lower retaining peg (see illustration). Remove the intercooler.
2.14 Intercooler retaining bolt (A) and upper air hose connection (B) - 1985
RS Turbo
15 Undo the two upper radiator retaining bolts, disengage the lower guides and move the radiator towards the engine taking care not to stretch the hoses.
16 Disconnect the fan wiring multi-plug, release the cable-tie and separate the fan wiring from the harness.
17 Carefully lift the fan up and out of its location. The fan, motor and shroud are serviced as an assembly on these models and further dismantling is not recommended.
Refitting
18 Refitting is the reverse sequence to
removal.
1986 models onwards
Removal
19 Disconnect the battery negative terminal.
20 Working through the aperture below the front bumper, release the wiring harness clips and unscrew the two shroud bracket retaining bolts (see illustrations).
2.20a Release the wiring harness clips . . .
2.20b . . . to gain access to the fan shroud bolts on 1986 RS Turbo models
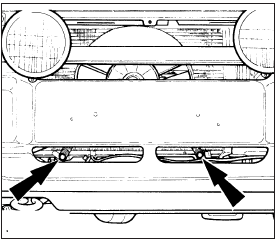
2.20c Fan shroud bracket retaining bolts - RS Turbo from 1986 onwards
21 Unhook the shroud from the top of the radiator, disconnect the wiring at the harness connector and remove the fan and shroud assembly from the front of the radiator.
22 Remove the fan guard from the shroud.
23 Extract the retaining circlip and washer, then withdraw the fan from the motor shaft.
24 Unscrew the three nuts, unclip the wiring and remove the motor from the shroud.
Refitting
25 Reassembly and refitting are the reversals
of the removal and dismantling operations.
See also:
Distributor (OHC models) - removal and refitting
Note: During production the engine ignition
timing is accurately set using a microwave
process, and sealant is applied to the
distributor clamp bolt. Removal of the
distributor should be avoided e ...
Steering intermediate shaft and flexible coupling - removal and refitting
Removal
1 Apply the handbrake, jack up the front of
the vehicle and support on axle stands.
2 Working in the engine compartment,
unscrew the bolt securing the intermediate
shaft to the inner colu ...
Engine - removal leaving manual gearbox in vehicle
Note: The air conditioning system should
always be discharged by a Ford dealer or air
conditioning specialist.
Note: Refer to the warning in Section 8 before
proceeding. A suitable hoist and lifti ...
