Thermostat - removal, testing and refitting
OHV engines Note: A new gasket must be used on refitting.
Removal
1 Drain the cooling system as described in
Chapter 1.
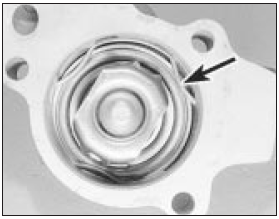
2 Slacken the clips and disconnect the hoses at the thermostat housing (see illustration).
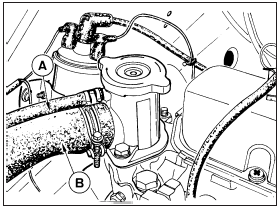
4.2 Expansion tank hose (A) and radiator top hose (B) connections at
thermostat housing - OHV engine
Disconnect the radiator fan thermal switch wiring plug.
3 Unscrew the two bolts and remove the thermostat housing cover. If it is tight carefully tap it with a soft-faced mallet.
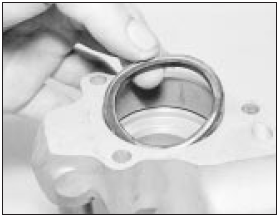
4 Extract the thermostat (see illustration). If it is stuck tight in its seat, do not lever it out by its bridge piece, but cut round it with a very sharp knife.
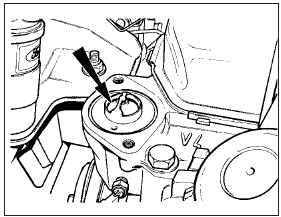
4.4 Thermostat location in cylinder head - OHV engine
Testing
5 To test the thermostat, first check that in a
cold condition its valve plate is closed.
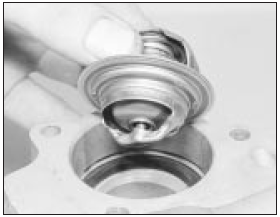
Suspend it on a string in a pan of cold water together with a thermometer (see illustration).
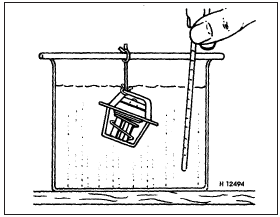
4.5 Testing the thermostat
Heat the water and check that the thermostat starts to open at the temperature given in the Specifications. It is difficult to check that the thermostat opens fully, as this occurs at a temperature above the boiling point of water.
6 Remove the thermostat from the water and check that the valve closes as the unit cools.
If the thermostat does not operate as described, obtain a new thermostat.
Refitting
7 Refitting is the reverse sequence to
removal, but ensure that all traces of old
gasket are removed from the housing mating
faces and use a new gasket lightly smeared
with jointing compound. Tighten the retaining
bolts to the specified torque.
8 On completion, refill the cooling system as described in Chapter 1.
CVH engines
Note: A new gasket must be used on refitting.
Removal
9 Drain the cooling system as described in
Chapter 1.
10 Slacken the clips and disconnect the expansion tank hose, radiator hose and heater hose at the thermostat housing (see illustration).
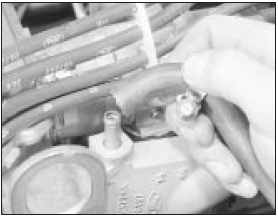
4.10 Disconnect the expansion tank hose at the thermostat housing - CVH
engine
11 Disconnect the radiator fan thermal switch wiring plug.
12 Unscrew the three bolts and remove the thermostat housing from the cylinder head. If it is stuck, tap it off carefully with a soft-faced mallet.
13 Extract the retaining spring clip and withdraw the thermostat from the housing followed by the sealing ring (see illustrations).
4.13a Extract the retaining spring clip (arrowed) . . .
4.13b . . . withdraw the thermostat . . .
4.13c . . . and remove the sealing ring
Testing and refitting 14 Proceed as described previously in this Section for OHV engines.
See also:
Radiator - removal, inspection and refitting
All models except RS Turbo
Pre-1986 models
Removal
1 Drain the cooling system as described in
Chapter 1.
2 Disconnect the battery negative terminal.
3 Release the retaining clips and disconnect
...
Cooling, heating and air conditioning systems
General information and precautions
General information
The cooling system is of pressurised type,
and consists of a front mounted radiator,
coolant pump, cooling fan, wax type
thermostat, and an ...
General information and precautions
The body electrical system consists of all
lights, wash/wipe equipment, interior
electrical equipment, and associated switches
and wiring.
The electrical system is of the 12 volt
negative earth t ...
