Fuel distributor - removal and refitting
Note: Refer to the precautions at the end of Section 1 before proceeding. It is important to note that each injection supply pipe connection in the distributor head has a screw adjacent to it. These four screws are not for adjustment and must not be removed or have their settings altered. A new O-ring and new banjo union sealing washers will be required on refitting.
K-Jetronic system
Removal
1 Disconnect the battery negative lead.
2 Relieve the system pressure by slowly loosening the fuel feed pipe union at the warm-up regulator (see illustration 6.3).
Absorb the fuel leakage in a cloth.
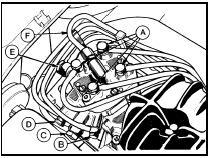
3 Disconnect the four injector feed pipes, the fuel inlet and return pipes, and the warm-up regulator feed and return pipe banjo unions at the fuel distributor (see illustration).

11.3 K-Jetronic fuel distributor pipe connections
A To injectors
B To cold start valve
C Fuel return
D From warm-up
regulator
E Fuel inlet
F To warm-up
regulator
Note the sealing washers on each side of the banjo unions which must be renewed on reconnection of the pipes. Take care not to allow dirt to enter the pipes or their connection ports.
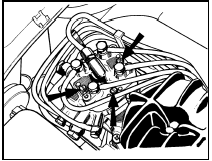
4 Unscrew the three retaining screws from the fuel distributor top face and remove the unit from the car (see illustration). Recover the sealing O-ring.

11.4 K-Jetronic system fuel distributor retaining screws (arrowed)
Refitting 5 Refitting is a reversal of removal, but ensure perfectly clean mating faces and use a new sealing O-ring and new washers for the banjo unions. Check for any signs of leaks on completion and adjust the idle speed and mixture settings as described in Chapter 1.
6 The main system fuel pressure should be checked and if necessary adjusted by a Ford dealer to ensure satisfactory running of the system.
KE-Jetronic system
Removal
7 Disconnect the battery negative lead.
8 Relieve the system pressure by slowly loosening the cold start valve union on the top of the fuel distributor (see illustration 6.4).
Absorb fuel leakage in a cloth.
9 Disconnect the four injector feed pipes, the cold start valve pipe and union adapter, the fuel inlet pipe and pressure regulator return pipe from the fuel distributor. Note the sealing washers on each side of the banjo unions which must be renewed on reconnection of the pipes. Take care not to allow dirt to enter the pipes or their connection parts.
10 Disconnect the wiring multi-plug from the pressure actuator on the side of the fuel distributor.
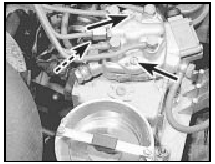
11 Undo the retaining screws and remove the fuel distributor (see illustration). Recover the sealing O-ring.

11.11 KE-Jetronic fuel distributor retaining screws (arrowed)
Refitting 12 Refitting is a reversal of removal, but ensure perfectly clean mating faces and use a new sealing O-ring and new washers for the banjo unions. Check for any signs of leaks on completion and adjust the idle speed and mixture settings as described in Chapter 1.
See also:
Accessories
FORD ACCESSORIES FOR YOUR VEHICLE
A wide selection of genuine Ford accessories are available for your
vehicle through your local authorized Ford, Lincoln, Mercury or Ford of
Canada dealer. These qu ...
Specifications
General
Engine type . . . . . . . . . . . . . . . . . . . . . . . . . . . . . . . . . .
. . . . . . . . . . . . . Four-cylinder, in-line overhead camshaft
Capacity:
1.1 litre . . . . . . . . . . ...
Rear suspension lower arm (Saloon, Hatchback and Estate models) - removal
and refitting
Models with rear drum brakes
Removal
1 Chock the front wheels, jack up the rear of
the vehicle and support on axle stands placed
under the side members.
2 Remove the relevant driveshaft.
3 Remov ...
