Ignition switch - removal and refitting
Pre-1986 models
Removal
1 Disconnect the battery, undo the screws
and remove the steering column lower
shroud.
2 Insert the ignition key into the lock and turn it to position I.
3 Using a flat-bladed screwdriver, depress the switch retaining clip, at the same time pulling out the switch using the ignition key (see illustration).
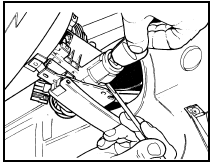
10.3 Ignition switch removal using a screwdriver to depress the switch
retaining clip - pre-1986 models
Refitting 4 Refitting is a reversal of removal, ensuring that the ignition key is in position I.
1986 models onwards
Removal
5 Disconnect the battery, undo the screws
and remove the steering column lower
shroud.
6 Insert the ignition key into the switch and turn it to position I.
7 Using a thin pointed tool, depress the lock spring through the access hole in the lock housing (see illustration). Pull on the key while holding the lock spring depressed, and remove the switch. It may be necessary to move the key slightly to the left and right to align the key barrel and lock housing cam, so permitting removal.

10.7 Ignition switch removal using a pointed tool to depress the lock spring
- 1986 models onwards
Refitting 8 Refitting is a reversal of removal, ensuring that the ignition key is in position I.
See also:
Expansion tank and coolant level sensor - removal and refitting
Removal
1 With the engine cold, slowly unscrew the
expansion tank cap to release any remaining
pressure from the cooling system. Remove
the cap.
2 Place a suitable container beneath the
expansio ...
General information and precautions
General information
From the 1990 model year, an Electronic
Fuel Injection (EFI) system controlled by the
Electronic Engine Control IV (EEC IV) system,
and incorporating an Electronic
Distributor ...
Fuel distributor - removal and refitting
Note: Refer to the precautions at the end of
Section 1 before proceeding. It is important to
note that each injection supply pipe connection
in the distributor head has a screw adjacent to
it. The ...
