Condenser (contact breaker system) - testing, removal and refitting
Note: Refer to the precautions given in Section 1 before proceeding.
Testing
1 The purpose of the condenser is to prevent
excessive arcing of the contact breaker
points, and to ensure that a rapid collapse of
the magnetic field, created in the coil, and
necessary if a healthy spark is to be produced
at the plugs, is allowed to occur.
2 The condenser is fitted in parallel with the contact breaker points. If it becomes faulty it will lead to ignition failure, as the points will be prevented from cleanly interrupting the low tension circuit.
3 If the engine becomes very difficult to start, or begins to miss after several miles of running, and the contact breaker points show signs of excessive burning, then the condition of the condenser must be suspect. A further test can be made by separating the contact breaker points by hand, with the ignition switched on. If this is accompanied by an excessively strong flash, it indicates that the condenser has failed.
4 Without special test equipment, the only reliable way to diagnose condenser trouble is to renew the suspect unit and note if there is any improvement in performance. To do this proceed as follows according to engine type.
Removal
OHV engines
5 Spring back the retaining clips and lift off
the distributor cap. Withdraw the rotor arm
from the distributor shaft.
6 Accurately mark the position of the distributor body in relation to the clamp plate, then slacken the clamp plate pinch bolt.
7 Turn the distributor body approximately 120° in a clockwise direction to expose the externally mounted condenser (see illustration).
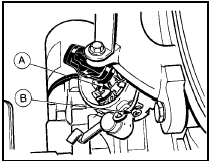
3.7 Distributor turned through 120° for condenser renewal - Bosch
distributor, OHV engines
A LT lead connector
B Condenser retaining screw
8 Disconnect the contact breaker points LT lead from the spade terminal, and the ignition LT lead at the coil.
9 Undo the retaining screw and withdraw the condenser from the side of the distributor body.
10 Place the new condenser in position and secure with the retaining screw.
11 Reconnect the LT leads, then turn the distributor back to its original position and align the marks made during removal. Tighten the clamp plate pinch bolt.
CVH engines
12 Spring back the retaining clips or undo
the screws as appropriate and lift off the
distributor cap.
13 On the Bosch distributor disconnect the contact breaker points LT lead from the spade terminal, undo the retaining screw and withdraw the condenser from the side of the distributor body. Disconnect the ignition LT lead at the coil and remove the condenser (see illustration).
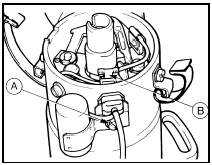
3.13 Bosch distributor condenser renewal - CVH engines
A Condenser retaining screw B LT lead connector
14 On the Lucas distributor ease the contact breaker spring arm out of the plastic insulator and slide the combined LT and condenser lead out of the hooked end of the spring arm.
Undo the condenser retaining screw and earth lead, disconnect the ignition LT lead at the coil, and withdraw the condenser and wiring from the distributor (see illustration).
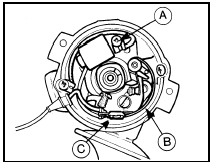
3.14 Lucas distributor condenser renewal - CVH engines
A Condenser retaining screw B Contact breaker spring arm C Hooked end of spring arm
Refitting
OHV engines
15 Refit the rotor arm and distributor cap. If
in any doubt about the distributor position,
check the ignition timing as described in
Chapter 1.
CVH engines
16 On all distributors refitting is the reverse
sequence to removal.
See also:
Identifying components in the engine compartment
2.0L DOHC Zetec engine
Transmission fluid dipstick (automatic transaxle)
Battery
Air filter assembly
Engine oil filler cap
Engine oil dipstick
Power steering fluid reservoir
Engine ...
Rear wheel bearings - renewal
Saloon, Hatchback and Estate
models
With rear drum brakes
Note: There are two types of bolts used to
secure the rear hub carrier to the lower arm
(see illustration).
14.1a Alternative types of ...
Engine/transmission mountings - removal and refitting
Refer to Part A, Section 11. ...
