Distributor - removal and refitting
Contact breaker ignition system
OHV engines
Removal
1 Disconnect the leads from the spark plugs,
spring back the retaining clips and lift off the
distributor cap.
2 Disconnect the LT lead at the coil negative terminal and the vacuum hose at the distributor vacuum unit.
3 Remove No 1 spark plug (nearest the crankshaft pulley). https://shopservicemanual.com/product/service-manual-ford-ranger-2019-578in1
4 Place a finger over the plug hole and turn the crankshaft in the normal direction of rotation (clockwise viewed from the crankshaft pulley end) until pressure is felt in No 1 cylinder. This indicates that the piston is commencing its compression stroke. The crankshaft can be turned with a spanner on the pulley bolt.
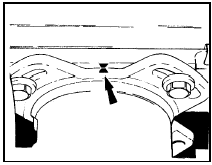
5 Continue turning the crankshaft until the notch in the pulley is aligned with the “O” mark on the timing scale just above the pulley. In this position No 1 piston is at Top Dead Centre (TDC) on compression (see illustration).
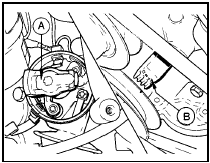
5.5 Distributor removal - OHV engines (contact breaker system)
A Rotor arm facing distributor cap No 1 spark plug lead segment B Pulley notch aligned with TDC mark on timing scale
6 Using a dab of quick drying paint, mark the position of the rotor arm on the rim of the distributor body. Make a further mark on the distributor body and a corresponding mark on the cylinder block.
7 Undo the bolt securing the distributor clamp plate to the cylinder block. Do not remove the distributor by releasing the clamp plate pinch bolt.
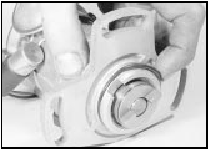
8 Withdraw the distributor from the cylinder block. As the distributor is removed, the rotor arm will move a few degrees clockwise. Note the new position of the rotor arm and make a second mark on the distributor body rim (see illustration).
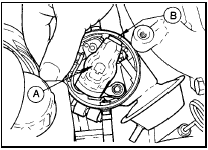
5.8 Rotor arm position marked on distributor body after removal - OHV engines
(contact breaker system)
A Rotor arm
B Mark made on distributor body rim
Refitting 9 Before installing the distributor make sure that the crankshaft is still positioned at TDC as previously described. If a new distributor is being fitted, transfer the markings made during removal to the new unit.
10 Hold the distributor over its hole in the cylinder block with the mark made on the distributor body aligned with the mark on the cylinder block.
11 Position the rotor arm so that it points toward the mark made on the distributor rim after removal and push the distributor fully home. As the skew gears mesh the rotor arm will move anti-clockwise and should align with the first mark made on the distributor rim.
12 With all the marks aligned, refit and tighten the distributor clamp plate retaining bolt.
13 Reconnect the LT lead and vacuum hose, then refit the distributor cap, spark plug and plug leads.
14 Refer to Chapter 1 and adjust the ignition timing.
CVH engines
Removal
15 Spring back the retaining clips, or undo
the retaining screws and lift off the distributor
cap.
16 Disconnect the LT lead at the coil negative terminal and the vacuum hose at the distributor vacuum unit.
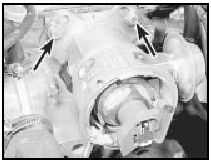
17 Undo the three distributor flange retaining bolts and withdraw the distributor from the cylinder head (see illustration).
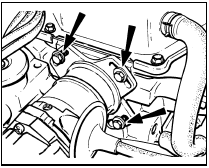
5.17 Distributor flange retaining bolt locations - CVH engines (contact
breaker system)
Refitting 18 Before refitting, check the condition of the O-ring oil seal at the base of the distributor and renew it if necessary.
19 Hold the distributor with the vacuum unit towards the inlet manifold side of the engine.
Align the distributor shaft drive dog with slots in the end of the camshaft (see illustration).
5.19 Align distributor shaft drive dog with slots in camshaft - CVH engines
(contact breaker system)
20 Insert the distributor and turn the rotor arm slightly so that the drive dogs engage and the distributor moves fully home. Refit but do not tighten the three retaining bolts.
21 During production the distributor is precisely positioned for optimum ignition timing and marked accordingly with a punch mark on the distributor mounting flange and the cylinder head (see illustration).
5.21 Distributor mounting flange and cylinder head punch mark locations - CVH
engines (contact breaker system)
22 If the original distributor is being refitted, align the punch marks, tighten the distributor flange mounting bolts and refit the distributor cap, LT lead and vacuum hose.
23 If a new distributor is being fitted, turn the distributor body so that the mounting bolts are positioned centrally in their elongated slots, then tighten the bolts just over finger tight. Refit the distributor cap, LT lead and vacuum hose, then adjust the ignition timing as described in Chapter 1.
Electronic breakerless ignition
OHV engines
Removal
24 Disconnect the leads from the spark
plugs, spring back the retaining clips and lift
off the distributor cap.
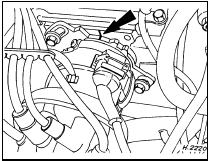
25 Disconnect the distributor LT wiring multiplug and the vacuum hose at the distributor vacuum unit (see illustration).
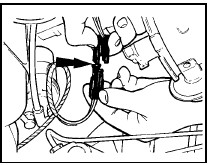
5.25 Disconnecting the distributor LT wiring multi-plug - CVH engines
(electronic breakerless system)
26 Proceed as described in paragraphs 3 and 4.
27 Refer to Chapter 1 and look up the ignition timing setting for the engine being worked on.
28 Continue turning the crankshaft until the notch in the pulley is aligned with the correct setting on the scale located just above and to the right of the pulley. The “O” mark on the scale represents Top Dead Centre (TDC) and the raised projections to the left of TDC are in increments of 4° BTDC (see illustration 5.5).
29 Check that the rotor arm is pointing to the notch on the rim of the distributor body (see illustration).
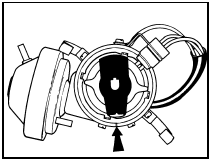
5.29 Rotor arm aligned with manufacturer’s mark on distributor body rim - OHV
engines (electronic breakerless system)
30 Make a mark on the distributor body and a corresponding mark on the cylinder block to aid refitting.
31 Undo the bolt securing the distributor clamp plate to the cylinder block, then withdraw the distributor from its location. As the distributor is removed, the rotor arm will move a few degrees clockwise. Note the new position of the rotor arm and make an alignment mark on the distributor body rim.
Refitting
32 Before installing the distributor, make sure
that the crankshaft is still positioned at TDC
as previously described. If a new distributor is
being fitted, transfer the markings made
during removal to the new unit.
33 Hold the distributor over its hole in the cylinder block with the mark made on the distributor body aligned with the mark made on the cylinder block.
34 Position the rotor arm so that it points to the mark made on the distributor rim after removal, and push the distributor fully home (see illustration). As the skew gears mesh, the rotor arm will move anti-clockwise and should align with the manufacturer’s mark on the distributor rim.
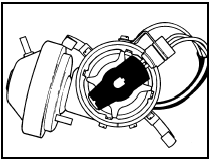
5.34 Rotor arm position prior to refitting - OHV engines (electronic
breakerless system)
35 With the distributor in place, turn the body slightly, if necessary so that the arms of the trigger wheel and stator are aligned, then refit and tighten the clamp plate bolt.
36 Reconnect the LT wiring multi-plug and vacuum hose, then refit the distributor cap, spark plug and plug leads.
37 Refer to Chapter 1 and adjust the ignition timing.
CVH engines
Removal
38 Spring back the retaining clips or undo the
retaining screws and lift off the distributor cap.
39 Disconnect the LT wiring multi-plug and the vacuum hose(s) at the distributor vacuum unit (where applicable).
40 Undo the distributor flange retaining bolts and withdraw the distributor from the cylinder head (see illustration).
5.40 Distributor flange upper retaining bolts (arrowed) - CVH engines
(electronic breakerless system)
Refitting 41 At the beginning of 1985 a modified distributor of either Bosch or Lucas manufacture was introduced for all CVH engines equipped with electronic ignition. The modified unit is identifiable from the earlier type by only having no retaining bolt flanges instead of the three used previously. If an early type distributor is being renewed, only the modified type will be supplied by Ford parts dealers and it will therefore also be necessary to obtain an LT wire assembly (part No. 84AG-12045-BA) to adapt the existing wiring on the car to suit the modified distributor. It is also recommended by the manufacturers that a complete new set of HT leads to the latest Ford specification is obtained at the same time. Apart from connecting the new LT wire assembly which is described later in this Section, fitting the new distributor is the same as for earlier units, as follows.
42 Before refitting check the condition of the O-ring seal at the base of the distributor and renew it if necessary (see illustration).
5.42 Checking the distributor O-ring seal condition - CVH engines (electronic
breakerless system)
43 Hold the distributor with the vacuum unit (where fitted) towards the inlet manifold side of the engine and align the distributor shaft drive dog with the slot in the end of the camshaft.
44 Insert the distributor and turn the rotor arm slightly so that the drive dogs engage and the distributor moves fully home. Refit but do not tighten the retaining bolts.
45 During production the distributor is precisely positioned for optimum ignition timing and marked accordingly with punch marks on the distributor mounting flange and the cylinder head (see illustrations).
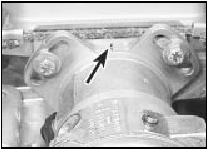
5.45a Distributor mounting flange and cylinder head punch marks (arrowed) -
CVH engines (electronic breakerless system - early type distributor shown)

5.45b Distributor mounting flange and cylinder head punch marks (arrowed) -
CVH engines (electronic breakerless system - later type distributor shown)
46 If the original distributor is being refitted, align the punch marks, tighten the distributor flange retaining bolts and refit the distributor cap, wiring multi-plug and vacuum hose(s) as applicable.
47 If a new distributor is being fitted, turn the distributor body so that the retaining bolts are positioned centrally in their elongated slots, then tighten the bolts just over finger tight.
48 Refit the distributor cap, wiring multi-plug and vacuum hose(s) (as applicable). If an early type distributor is being replaced with the modified type, connect the green wire of the new LT wire assembly to the coil negative terminal, the black wire to the positive terminal and the brown wire to a suitable earth. Join the existing coil wires to the stud terminals of the new wiring assembly, green to green and black to black (see illustration).
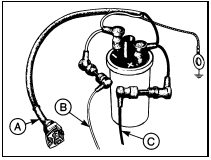
5.48 LT wire assembly to suit modified distributor - CVH engines (electronic
breakerless system)
A Wiring multi-plug to amplifier module
B Green wire
C Black wire
49 Adjust the ignition timing (Chapter 1).
Programmed electronic ignition
(EEC IV) - 1.4 litre fuel injection
engines
Removal
Note: During production, engines are timed to
an accuracy of half a degree using a
microwave timing system. Subsequent timing
requires the use of special test equipment.
Unless absolutely necessary do not remove
the distributor
50 Disconnect the battery negative lead.
51 Disconnect the HT lead from the coil, then remove the distributor cap and position it to one side.
52 Disconnect the distributor wiring plug.
53 Ensure that there are suitable alignment marks between the base of the distributor and the cylinder head. If necessary, make suitable marks using a scribe or a centre punch (see illustration).
5.53 Make alignment marks (arrowed) between the distributor and cylinder head
to assist alignment on refitting - 1.4 litre fuel injection engine
54 Remove the distributor retaining bolts and withdraw the distributor from the cylinder head.
Refitting
55 Commence refitting by checking the
condition of the distributor oil seal, renewing it
if necessary. Lubricate the seal with clean
engine oil.
56 Align the distributor drive dog with the slot in the camshaft. The dog will only fit one way, as the slot is offset.
57 Loosely secure the distributor to the cylinder head with the retaining bolts, then turn the distributor body until the marks on the base of the distributor and the cylinder head are aligned. If a new distributor or cylinder head has been fitted, position the wiring plug as shown (see illustration). Tighten the retaining bolts.
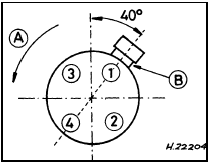
5.57 Correct alignment of distributor wiring plug - 1.4 litre fuel injection
engine
A Direction of rotation B Centreline through distributor wiring plug (40° to the vertical)
58 Reconnect the distributor wiring plug, then fit the distributor cap and reconnect the coil HT lead.
59 Reconnect the battery negative lead.
60 Take the vehicle to a Ford dealer at the earliest opportunity to have the ignition timing accurately adjusted.
See also:
Rear drum brake shoes - inspection and renewal
Caution: Refer to the
precautions in Section 1
1 The shoe friction material can be inspected
for wear without removing the roadwheels.
Working beneath the vehicle, prise the plug
from the brake b ...
Crankshaft and main bearings - removal and refitting
Note: A new crankshaft rear oil seal and a new
rear oil seal housing gasket should be used on
refitting.
Removal
1 With the engine removed from the vehicle,
remove the timing chain and crankshaft ...
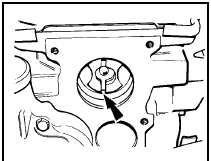
Front brake disc pad check (Every 6000 miles or 6 months)
1 Place a mirror between the roadwheel and
the caliper and check the thickness of the
friction material of the disc pads (see
illustration). If the material has worn down to
the specified minimum ...
