Handbrake cables - renewal
1 Chock the front wheels, then fully release the handbrake.
2 Raise and support the vehicle at the rear with axle stands (see “Jacking and Vehicle Support”).
Primary cable
3 Extract the spring clip and clevis pin and
disconnect the primary cable from the
equaliser (see illustrations).
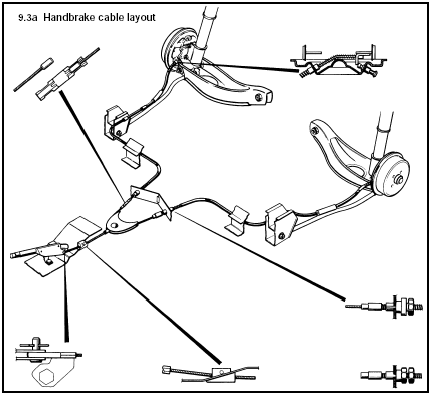
9.3a Handbrake cable layout
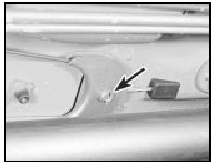
9.3b Primary cable-to-equaliser clevis pin and spring clip (arrowed)
4 Working inside the vehicle, disconnect the cable from the hand-brake control lever, again by removal of clip and pin. Drift out the cable guide to the rear and withdraw the cable through the floorpan.
5 Refitting is a reversal of removal. Adjust the handbrake, if necessary, as described in Section 8.
Secondary cable
6 Using the procedure described in Section
8, slacken the cable adjusting nut so that the
abutment sleeve can be disengaged from its
body guide (see illustration).
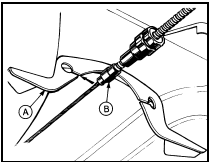
9.6 Removing handbrake cable abutment sleeve from the body guide
A Body guide B Secondary cable
7 Release the cable connector from its body guide by extracting the spring clip and passing the inner cable through the slit in the guide (see illustration).
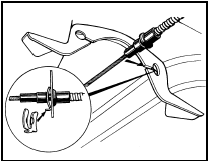
9.7 Handbrake cable connector spring clip removal
8 Now disconnect the cable from its body guide on the right-hand side of the vehicle.
9 Separate the cable assembly/equaliser from the primary cable by extracting the spring clip and clevis pin.
10 Release the cable from the body guides.
11 Remove the rear roadwheels and the brake drums.
12 Release the shoe hold-down spring so that the shoe can be swivelled and the handbrake lever unclipped from the relay lever.
13 Remove the cable ends through the brake backplate and withdraw the complete cable assembly from the vehicle.
14 Refitting is a reversal of removal. Grease the cable groove in the equaliser and adjust the handbrake, as described in Section 8.
See also:
Engine Coolant Temperature (ECT) sensor - removal and refitting
Removal
1 The sensor is screwed into the cylinder
block below the inlet manifold.
2 Disconnect the battery negative lead.
3 Drain the cooling system as described in
Chapter 1.
4 Disconnect the s ...
Throttle housing - removal and refitting
Note: During manufacture the throttle plate is
adjusted so that it is fractionally open, to avoid
the possibility of it jamming shut, and it must
not be repositioned. Idle speed adjustment is
prov ...
Front suspension lower arm - removal, overhaul and refitting
Note: A balljoint separator tool will be
required for this operation.
Removal
1 To improve access, raise the front of the
vehicle on ramps. Do not jack the vehicle up
at this stage. Apply the han ...
