Hydraulic pipes and hoses - renewal
Note: Before starting work, refer to the warning at the beginning of Section 3 concerning the dangers of hydraulic fluid.
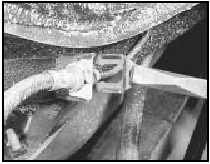
1 Always disconnect a flexible hose by prising out the spring anchor clip from the support bracket and then, using two closefitting spanners, disconnect the rigid line from the flexible hose (see illustration).

15.1 Removing a flexible hose spring anchor clip
2 Once disconnected from the rigid pipe, the flexible hose may be unscrewed from the caliper or wheel cylinder.
3 When reconnecting pipelines, or hose fittings, remember that all union threads are to metric sizes. No copper washers are used at unions and the seal is made at the swaged end of the pipe, so do not try to wind a union in if it is tight yet still stands proud of the surface into which it is screwed.
4 A flexible hose must never be installed twisted, but a slight “set” is permissible to give it clearance from an adjacent component. Do this by turning the hose slightly before inserting the bracket spring clip.
5 Rigid pipelines can be made to pattern by factors supplying brake components.
6 If you are making up a brake pipe yourself, observe the following essential requirements.
7 Before flaring the ends of the pipe, trim back the protective plastic coating by a distance of 5.0 mm.
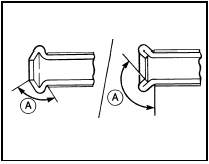
8 Flare the end of the pipe as shown (see illustration).

15.8 Brake pipe flare
A Protective coating removed before flaring
9 The minimum pipe bend radius is 12.0 mm, but bends of less than 20.0 mm should be avoided if possible.
See also:
Oil pump - dismantling, inspection and reassembly
Dismantling
1 The oil pump can be dismantled for
cleaning, but if any of the components are
worn, the pump must be renewed as an
assembly.
2 To dismantle the pump, proceed as follows.
3 Unscrew ...
Accelerator pedal - removal and refitting
The procedure is the same as described in
Part A of this Chapter for carburettor models. ...
Front suspension lower arm (forged type) - removal, overhaul
and refitting
1 The forged type suspension arm is fitted to
all models except pre-May 1983 1.1 litre
versions.
Removal
2 Jack up the front of the car and support it
on stands (see “Jacking and Vehicle Support” ...
