Braking system warning lamps and electrical switches - removal and refitting
General
1 All models are fitted with a low fluid level
warning switch in the master cylinder reservoir
cap and a brake pedal stop-lamp switch.
2 Some versions have front disc pad wear sensors and a handbrake “ON” warning switch.
3 Warning indicator lamps are mounted on the instrument panel. Their renewal is covered in Chapter 12.
Handbrake “ON” warning lamp
switch
4 The handbrake “ON” warning switch is
attached to the handbrake lever and can be
removed after disconnecting the wiring and
undoing the retaining screw (see illustration).
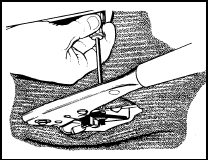
18.4 Removing handbrake warning switch
Stop-lamp switch 5 The stop-lamp switch can be removed by disconnecting the leads and unscrewing the locknut which holds the switch to its bracket under the facia (see illustration).
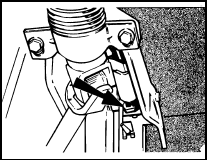
18.5 Brake stop-lamp switch locknut location (arrowed)
6 When fitting the switch, adjust its position by screwing it in or out so that it does not actuate during the first 5.0 mm of pedal travel.
See also:
Ford Escort Service and Repair Manual
Routine maintenance and servicin
...
Fuses and relays
Fuses
If electrical components in the
vehicle are not working, a fuse may
have blown. Blown fuses are
identified by a broken wire within
the fuse. Check the appropriate
fuses before replacing an ...
Electrical fault finding - general information
Refer to Chapter 12. ...
