Front suspension lower arm (forged type) - removal, overhaul and refitting
1 The forged type suspension arm is fitted to all models except pre-May 1983 1.1 litre versions.
Removal
2 Jack up the front of the car and support it
on stands (see “Jacking and Vehicle Support”).
3 Undo the nut and remove the pivot bolt securing the lower arm at its inboard end (see illustration).
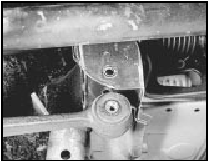
3.3 Suspension lower arm disconnected at inboard end
4 Disconnect the lower arm balljoint from the hub carrier by removing the nut and pinchbolt.
Note that the pinch-bolt is of the socketheaded (Torx) type and a special key or socket bit (available from accessory shops) will be required for this purpose (see illustrations).
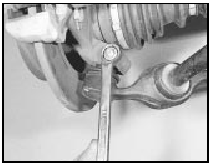
3.4a Removing the lower arm balljoint pinch-bolt nut

3.4b Separating the balljoint from the hub carrier
5 Unscrew and remove the nut, washer and bush from the end of the anti-roll bar as described in Section 5 (or tie-bar on 1985 RS Turbo models) (see illustration). Withdraw the arm from under the car.

3.5 Anti-roll bar-to-lower arm mounting
A Nut
B Dished washer
C Bushes
D Lower arm
E Anti-roll bar
Overhaul 6 Renewal of the pivot bush at the inboard end of the arm is possible using a vice and small tubes of suitable diameter (see illustration). Lubricate the new bush thoroughly with rubber grease to ease installation.
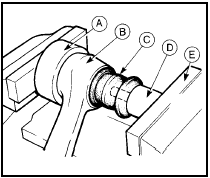
3.6 Method of fitting lower arm inboard pivot bush
A Tubular spacer
B Lower arm
C Bush
D Tube or
socket
E Vice
7 If the balljoint is worn it will be necessary to renew the arm complete as the balljoint cannot be removed separately.
Refitting
8 Refitting is the reverse sequence to
removal. Tighten all nuts and bolts to the
specified torque with the weight of the car on
its roadwheels. When refitting the Torx pinchbolt,
note that the head of the bolt must face
the rear of the car.
See also:
Diagram 2: 1980-86 Lighting all models
Diagram 2: 1980-86 Lighting all models ...
Ignition system component check (Every 24 000 miles (40 000 km) or 2 years)
1 Before disturbing any part of the ignition
system, disconnect the battery negative lead.
2 Identify and clearly mark all HT leads before
disconnecting them from the spark plugs.
3 Refer to the a ...
Cylinder head - removal and refitting
Carburettor engines
Removal
Note: The cylinder head must only be
removed when the engine is cold. New
cylinder head bolts and a new gasket must be
used on refitting.
1 Disconnect the battery ear ...
