Front anti-roll bar - removal and refitting
Removal
1 The anti-roll bar is used in conjunction with
the forged type suspension lower arm.
2 Jack up the front of the car and support it on stands (see “Jacking and Vehicle Support”).
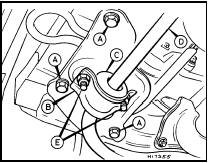
3 Where fitted flatten the lockplate tabs and unscrew the two bolts or two nuts each side securing the anti-roll bar clamps to the underbody (see illustrations).

5.3a Anti-roll bar front mounting clamp details - pre-1986 models
A Body bracket
B Anti-roll bar
C Clamp
D Retaining bolts
E Lockplates
F Bush
5.3b Anti-roll bar front mounting clamp details - post-1986 models
A Body bracket
bolts
B Clamp
C Bush
D Anti-roll bar
E Retaining nuts
4 Disconnect the ends of the anti-roll bar by unscrewing the nuts and removing the washers and the bushes (see illustration).
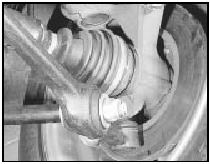
5.4 Anti-roll to lower arm retaining nut
Note that the nut on the right-hand side of the anti-roll bar has a left-hand thread and is unscrewed by turning it clockwise.
5 On 1985 RS Turbo models separate the ends of the anti-roll bar from the tie-bars by releasing the clamp nuts and bolts (see illustration 6.12).
6 On all models except 1985 RS Turbo undo the nut and remove the pivot bolt securing one of the suspension lower arms at its inboard end.
7 Withdraw the anti-roll bar from the lower arms and remove it from under the car.
8 Remove the remaining rubber bush and washer from each end of the anti-roll bar.
Smear the bar with rubber grease to aid bush removal.
Refitting
9 Inspect the bushes carefully and renew
them if they show any signs of cracking,
splitting or deformation. Bushes of different
material have been introduced on Escort
models during the course of production and it
is therefore essential that the bushes are
always renewed in sets of four to ensure that
all are of the same type.
10 Refitting is the reverse sequence to
removal but bearing in mind the following
points:
a) Lubricate the bushes with rubber grease
to aid refitting.
b) Ensure that the end of the anti-roll bar with the left-hand thread is fitted to the right-hand side of the car.
c) Fit the washers with their concave sides facing away from the bushes.
d) Tighten all nuts and bolts with the weight of the car on its roadwheels.
e) Where lockplates are used, bend up the tabs to lock the bolts after tightening.
See also:
SOHC engines
General information
The engine is of a four-cylinder, in-line,
single overhead camshaft type, mounted at
the front of the vehicle and available in 1.3,
1.6, 1.8 and 2.0 litre versions.
The cranks ...
Facia panel switches - removal and refitting
1 Disconnect the battery negative lead.
Rocker switches and push button
switches
2 Using a thin-bladed screwdriver, carefully
prise the switch from the facia panel.
3 Disconnect the wiring plug a ...
Bodywork and fittings
The body is of welded steel construction available in 3 or
5-door Hatchback, 3 or 5- door Estate, soft-top Cabriolet, or Van
configurations.
The body is of monocoque construction and is of energy ...
