Front tie-bar - removal and refitting
Pre-May 1983 1.1 litre models
Removal
1 Jack up the front of the car and support it
on stands (see “Jacking and Vehicle Support”).
2 Unscrew and remove the nut which holds the tie-bar to the large pressed steel mounting bracket (see illustration). Take off the dished washer and the rubber insulator.
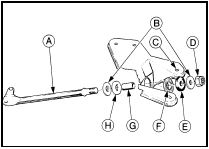
6.2 Front tie-bar mountings - pre-May 1983 1.1 litre models
A Tie-bar
B Flat washers
C Mounting bracket
D Retaining nut
E Front insulator
F Bush
G Steel sleeve
H Rear insulator
3 Disconnect the lower arm balljoint from the hub carrier by removing the nut and pinchbolt.
Note that the pinch-bolt is of the socketheaded (Torx) type and a special key or socket bit (available from accessory shops) will be required for this purpose.
4 Unbolt the opposite end of the tie-bar from the suspension arm.
5 Withdraw the tie-bar from its pressed steel bracket and take off the remaining washer, insulator and steel sleeve.
Refitting
6 Where necessary the bush in the pressed
steel mounting bracket can be renewed if the
old bush is drawn out using a bolt, nut and
suitable distance pieces.
7 Refitting the tie-bar is a reversal of removal.
Finally tighten all nuts and bolts to the specified torque only when the weight of the vehicle is again on its roadwheels. When refitting the Torx pinch-bolt note that the head of the bolt must face the rear of the car.
1985 RS Turbo models
Removal
8 Jack up the front of the vehicle and support
it on stands (see “Jacking and Vehicle
Support”).
9 Undo the nut and remove the washer and bush securing the end of the tie-bar to the suspension arm.
10 Undo the nut and bolt and remove the tiebar- to-anti-roll bar clamp.
11 Undo the tie-bar front nut and pivot bolt and remove the bar from under the car.
Refitting
12 Do not alter the length of the tie-rod
otherwise the steering castor angle will have
to be reset. If the length has been altered or if
a new tie-bar is being fitted, set the length to
the basic setting as shown (see illustration).
The length can be adjusted by slackening the forward clamp bolt and turning the threaded portion as necessary. Tighten the clamp after adjustment.
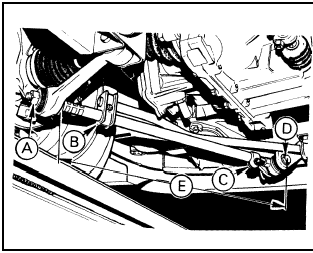
6.12 Front tie-bar mountings - 1985 RS Turbo models
A Retaining nut
B Anti-roll bar clamp
C Adjustment clamp
D Front mounting bolt
E Basic setting length
= 565 ± 1.5 mm
(22.24 ± 0.6 in)
13 Refitting is the reverse sequence to removal but tighten all nuts and bolts to the specified torque with the weight of the car on its roadwheels.
See also:
Routine maintenance and servicing
This Chapter is designed to help the home mechanic maintain his/her vehicle
for safety, economy, long life and peak performance.
The Chapter contains a master maintenance schedule, followed by Sect ...
Crankshaft and main bearings - removal and refitting
1.8 litre (R2A type)
Removal
1 With the engine removed from the vehicle,
remove the timing belt, crankshaft sprocket
and thrustwasher.
2 Remove the pistons and connecting rods. If
no work is to ...
Auxiliary warning system components - removal and refitting
General
1 This system monitors the fluid levels and
front brake pads for excessive wear. In the
event of a fluid level dropping below the
specified level, or the brake pads wearing
down to the mi ...
