Rear shock absorbers (Van models) - removal, testing and refitting
Removal
1 Raise and support the rear of the vehicle on
stands (see “Jacking and Vehicle Support”).
Place a jack beneath the rear axle tube and just raise it slightly.
2 Disconnect the shock absorber lower mounting by unscrewing the nut and pivot bolt.
3 Unbolt the top mounting bracket from the body and withdraw the unit (see illustration).
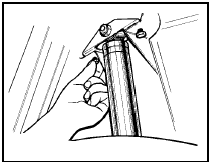
11.3 Removing the rear shock absorber top mounting bracket - Van models
4 Undo the nut and pivot bolt to separate the mounting bracket from the shock absorber.
Testing
5 Proceed as described in Section 10.
Refitting
6 Refitting is a reversal of removal, but if a
new unit is being installed, prime it first in a
similar way to that described for testing.
See also:
General Repair Procedures
Whenever servicing, repair or overhaul work
is carried out on the car or its components, it
is necessary to observe the following
procedures and instructions. This will assist in
carrying out the ...
Battery - removal and refitting
Note: Refer to the precautions at the end of
Section 1 before proceeding.
Removal
1 The battery is located on the left-hand side
of the engine compartment on a bulkhead
platform.
2 Disconnect th ...
Front brake disc - inspection, removal and refitting
Note: Before starting work, refer to the
warning at the beginning of Section 2
concerning the dangers of asbestos dust.
Inspection
1 Fully apply the handbrake then loosen the
front roadwheel bolt ...
