Power-operated folding roof - fluid level checking and bleeding
General
1 As from 1987, a power-operated folding
roof is available as an option on Cabriolet
models.
2 The roof is operated hydraulically from an electric pump located in the left-hand side of the boot. Hydraulic rams, mounted on each side of the vehicle by the rear wheel housings, actuate the roof folding mechanism. A control switch is mounted on the centre console. In the event of failure, the roof can be operated manually by opening a bypass valve on the side of the pump.
3 The system is sealed and requires no regular maintenance apart from periodic checking of the fluid level.
Fluid level checking
4 The level should be checked with the roof
open. With the roof in the closed position, the
level will be lower due to the displacement of
the hydraulic rams.
5 Pull down the trim panel/pump cover on the left-hand side of the boot.
6 Check that the fluid in the reservoir on the end of the pump is between the “MIN” and “MAX” marks on the sight glass (see illustration).
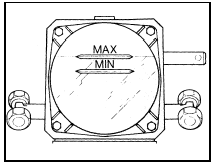
23.6 Fluid level sight glass for poweroperated folding roof
7 If the level requires topping-up, remove the filler plug from the top of the pump reservoir and fill the reservoir with the specified fluid until the level reaches the “MAX” mark (see illustration).
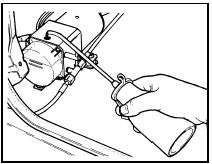
23.7 Filling the power-operated folding roof fluid pump reservoir
8 Refit the filler plug and trim panel.
Bleeding
9 Open the bypass valve on the side of the
pump body (see illustration).
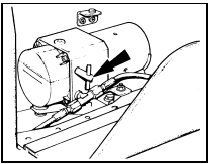
23.9 Bypass valve (arrowed) on side of power-operated folding roof fluid pump
10 Open, close and re-open the roof manually.
11 Fill the reservoir to the “MAX” mark, then fit the filler plug loosely and close the bypass valve on the side of the pump.
12 Open and close the roof several times using the power mode.
13 When all air has been bled from the system the roof will operate smoothly without jerking, and the level of noise from the pump will be steady.
14 Top-up the system, tighten the filler plug and refit disturbed panels.
See also:
Carburettor (Weber 2V type) - fast idle speed adjustment
1 This procedure does not apply to models
fitted with a carburettor stepper motor, for
which no adjustment is possible.
2 Check the idle speed and mixture. The idle
speed must be correct before at ...
Steering angles and wheel alignment
1 Accurate front wheel alignment is essential
to good steering and for even tyre wear.
Before considering the steering angles, check
that the tyres are correctly inflated, that the
roadwheels are ...
Rear shock absorber - removal and refitting
Saloon and Hatchback models
1 With the weight of the vehicle resting on the
roadwheels, work under the vehicle to
unscrew and remove the shock absorber
lower mounting bolt and nut from the relevan ...
