Bulbs (interior lamps) - renewal
Pre-1986 models
Glove compartment lamp
1 This is simply a matter of gently pulling the
bulb from its holder.
Heater control illumination lamp 2 Slide the heater control levers to the top of their travel.
3 Pull off the heater motor switch knob, then unclip the control trim panel from the facia.
4 Pull the bulb from the lamp socket.
5 Refitting is a reversal of removal.
Hazard warning switch lamp 6 Grip the switch cover and pull it off.
7 Gently pull the bulb from its socket (see illustration).
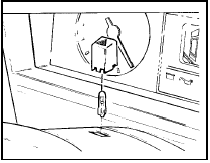
6.7 Hazard warning switch bulb renewal - pre-1986 models
8 Refitting is a reversal of removal.
Interior lamp
9 Carefully prise the lamp from its location
and remove the bulb from its spring contact
on the lamp body.
10 Fit the new bulb using a reversal of the removal procedure.
Load space lamp
11 Using a thin screwdriver, prise the lamp
from its location (see illustration).
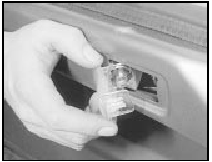
6.11 Removing the load space lamp
12 Remove the bulb from its spring contact clip.
13 Fit the new bulb using a reversal of the removal procedure.
Load space lamp (Cabriolet) 14 Open the boot lid and prise out the lamp with a thin screwdriver.
15 Depress and twist the bulb from the holder.
16 Fit the new bulb using a reversal of the removal procedure.
Roof-mounted clock illumination lamp 17 Remove the clock (Section 13).
18 Remove the rear cover from the unit by depressing the two clips at the top outer corners of the cover.
19 The bulb is a bayonet fitting in its holder.
20 Refitting is a reversal of removal.
1986 models onwards
Note: With the exception of the bulbs listed in
the following paragraphs, removal and refitting
of all bulbs is as described previously in this
Section for pre-1986 models.
Glove compartment lamp
21 From inside the glove compartment undo
the two switch assembly retaining screws and
withdraw the assembly.
22 Using a thin screwdriver carefully prise out the switch and remove the bulb by pushing and turning anti-clockwise.
23 Refitting is a reversal of removal.
Heater control illumination lamp 24 Pull off the three heater control knobs.
25 Undo the two retaining screws and withdraw the heater control panel.
26 From the rear of the panel, push and turn the bulb anti-clockwise to remove.
27 Fit the new bulb using a reversal of the removal procedure.
Manual choke knob warning lamp 28 Remove the choke knob by depressing the pin located on the underside of the knob.
29 Withdraw the sleeve, then remove the bulb by pushing it down, then pushing down the bulb retainer using a thin screwdriver.
30 Refitting is a reversal of removal.
Fuel computer lamp
31 Remove the fuel computer (Section 14).
32 Using thin-nosed pliers, turn the bulbholder anti-clockwise to remove it then withdraw the push-fit bulb.
33 Refitting is a reversal of removal.
See also:
Front suspension lower arm (forged type) - removal, overhaul
and refitting
1 The forged type suspension arm is fitted to
all models except pre-May 1983 1.1 litre
versions.
Removal
2 Jack up the front of the car and support it
on stands (see “Jacking and Vehicle Support” ...
Fuses, relays and circuit breakers - general information
Pre-1986 models
1 The fuses and most of the relays are
located in a plastic box attached to the
bulkhead on the driver’s side of the engine
compartment.
2 The fuses are numbered to identify the
...
Electric cooling fan - removal and refitting
CVH models
1 Disconnect the battery negative lead.
Unclip the wiring connector from the fan
motor then unscrew the retaining nuts and
washers. Withdraw the fan shroud and
cooling fan assembly (se ...
