Front and rear brake pad/shoe check (Every 6000 miles (10 000 km) or 6 months)
1 Firmly apply the handbrake, then jack up the front and rear of the car and support it securely on axle stands (see “Jacking and vehicle support”).
2 For a quick check, the front brake disc pads can be inspected without removing the front wheels by inserting a mirror between each caliper and roadwheel (see illustration). If any one pad is worn down to the minimum specified thickness, all four pads (on both front wheels) must be renewed.
To understand the benefits of proper installation, check this information.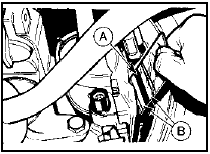
9.2 Using a mirror to inspect the disc pad friction material for wear
A Brake disc B Brake disc pads
3 It is necessary to remove the rear wheels in order to inspect the rear disc pads. The pads can be viewed through the top of the caliper after removing the blanking spring clip (see illustration). If any one pad is worn down to the minimum specified, all four pads (on both rear wheels) must be renewed.
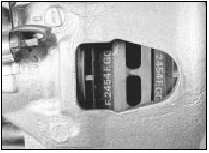
9.3 Disc pads viewed through caliper inspection hole (roadwheel removed)
4 For a comprehensive check, the brake disc pads should be removed and cleaned. The operation of the caliper can then also be checked, and the condition of the brake discs can be fully examined on both sides. Refer to Chapter 10 for further information.
5 On rear drum brake models, the brake shoe friction material can be inspected for wear without removing the roadwheels. Working beneath the vehicle, prise the plug from the brake backplate, and using an inspection lamp or torch, check that the friction material thickness is not less than the minimum given in the Specifications (see illustration). If any one of the shoes has worn below the specified limit, the shoes must be renewed as an axle set (4 shoes).
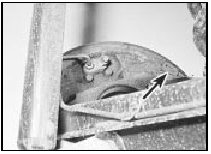
9.5 Brake shoe inspection hole plug (arrowed)
6 At the same interval, check the function of the brake fluid level warning light. Chock the wheels, release the handbrake and switch on the ignition. Unscrew and raise the brake fluid reservoir cap whilst an assistant observes the warning light: it should come on as the level sensor is withdrawn from the fluid. Refit the cap.
7 On completion, refit the wheels and lower the car to the ground.
See also:
Electronic Fuel Injection (EFI) system
From the 1990 model year, an Electronic Fuel Injection (EFI)
system controlled by the Electronic Engine Control IV (EEC IV) system, and
incorporating an Electronic Distributorless Ignition system ...
Seat belts - removal and refitting
Front seat belt stalk
1 Remove the front seat.
2 Detach the seat belt stalk from the seat by
removing the two Torx screws.
3 Refitting is a reversal of removal.
Front seat belt assembly
4 Where ...
Temperature gauge sender unit - removal and refitting
Note: Suitable jointing compound will be
required on refitting.
Removal
1 With the engine cold unscrew the pressure
cap on the thermostat housing or expansion
tank as applicable, then refit it. T ...
